.svg)


Forbes estimates that the online education market will reach $350 Billion by 2025.
It is a market that anyone can enter as long as they have valuable information to share.
Chances have you created a course (or are thinking of starting a course), and you want to know how you can sell your course.
This short article will discuss some of the best websites to sell courses and how you can sell your own.
There is no better time to get started selling online, so why not start today!
Best Website Builder To Sell Online Courses
Before you sell your course, you will need a website to market your course.
A few website builders can get you up and running, like WordPress, for example.
But, if you choose to go that route, it will be expensive, and you have to have a bit of technical know-how.
If you choose to use WordPress, you have to:
- Find a hosting provider
- Connect your domain to the hosting provider
- Find a theme
- Upload the theme
- Customize the theme
- Get plugins
The list goes on and on.
There is a learning curve that demotivates users.
They give up because they believe it to be too complicated.
That is why we recommend users looking to create a website using Webflow.
Webflow is a website builder that has lots of templates, and they handle the technical stuff.
- You don't have to worry about finding a host
- You don't have to worry about connecting your domain to the host
- You don't have to worry about finding an optimized theme
There is less of a learning curve, and you can get up and running relatively fast.
The best part is you only have to pay once you're ready to go live.
And once you're ready to go live, they have plans starting at only $15/mo.
Here are some paid Webflow themes.
Here are some free Webflow themes.
Regardless if you use paid or free themes, you can change the theme to your liking.
Webflow has a bunch of tutorials on changing templates to help you if you get stuck.
Once you customize it to your liking, then you will want to connect your domain to Webflow.
Webflow has detailed instructions here:
Using Kajabi To Host Your Course On Your Website
Now that you find a theme that you like, it's time to upload your course content.
But not to Webflow.
In this case, we are going to use Kajabi.
Note: This article assumes that you already have created your course. If you want to learn how to make an online course, we recommend going to YouTube to learn how.
Kajabi is a course hosting platform that makes it easy for course creators to upload their courses.
To get started, you'll need a Kajabi account.
Once you sign up, you will want to click the products menu item in the left-hand corner.
Then you will want to add a new product.
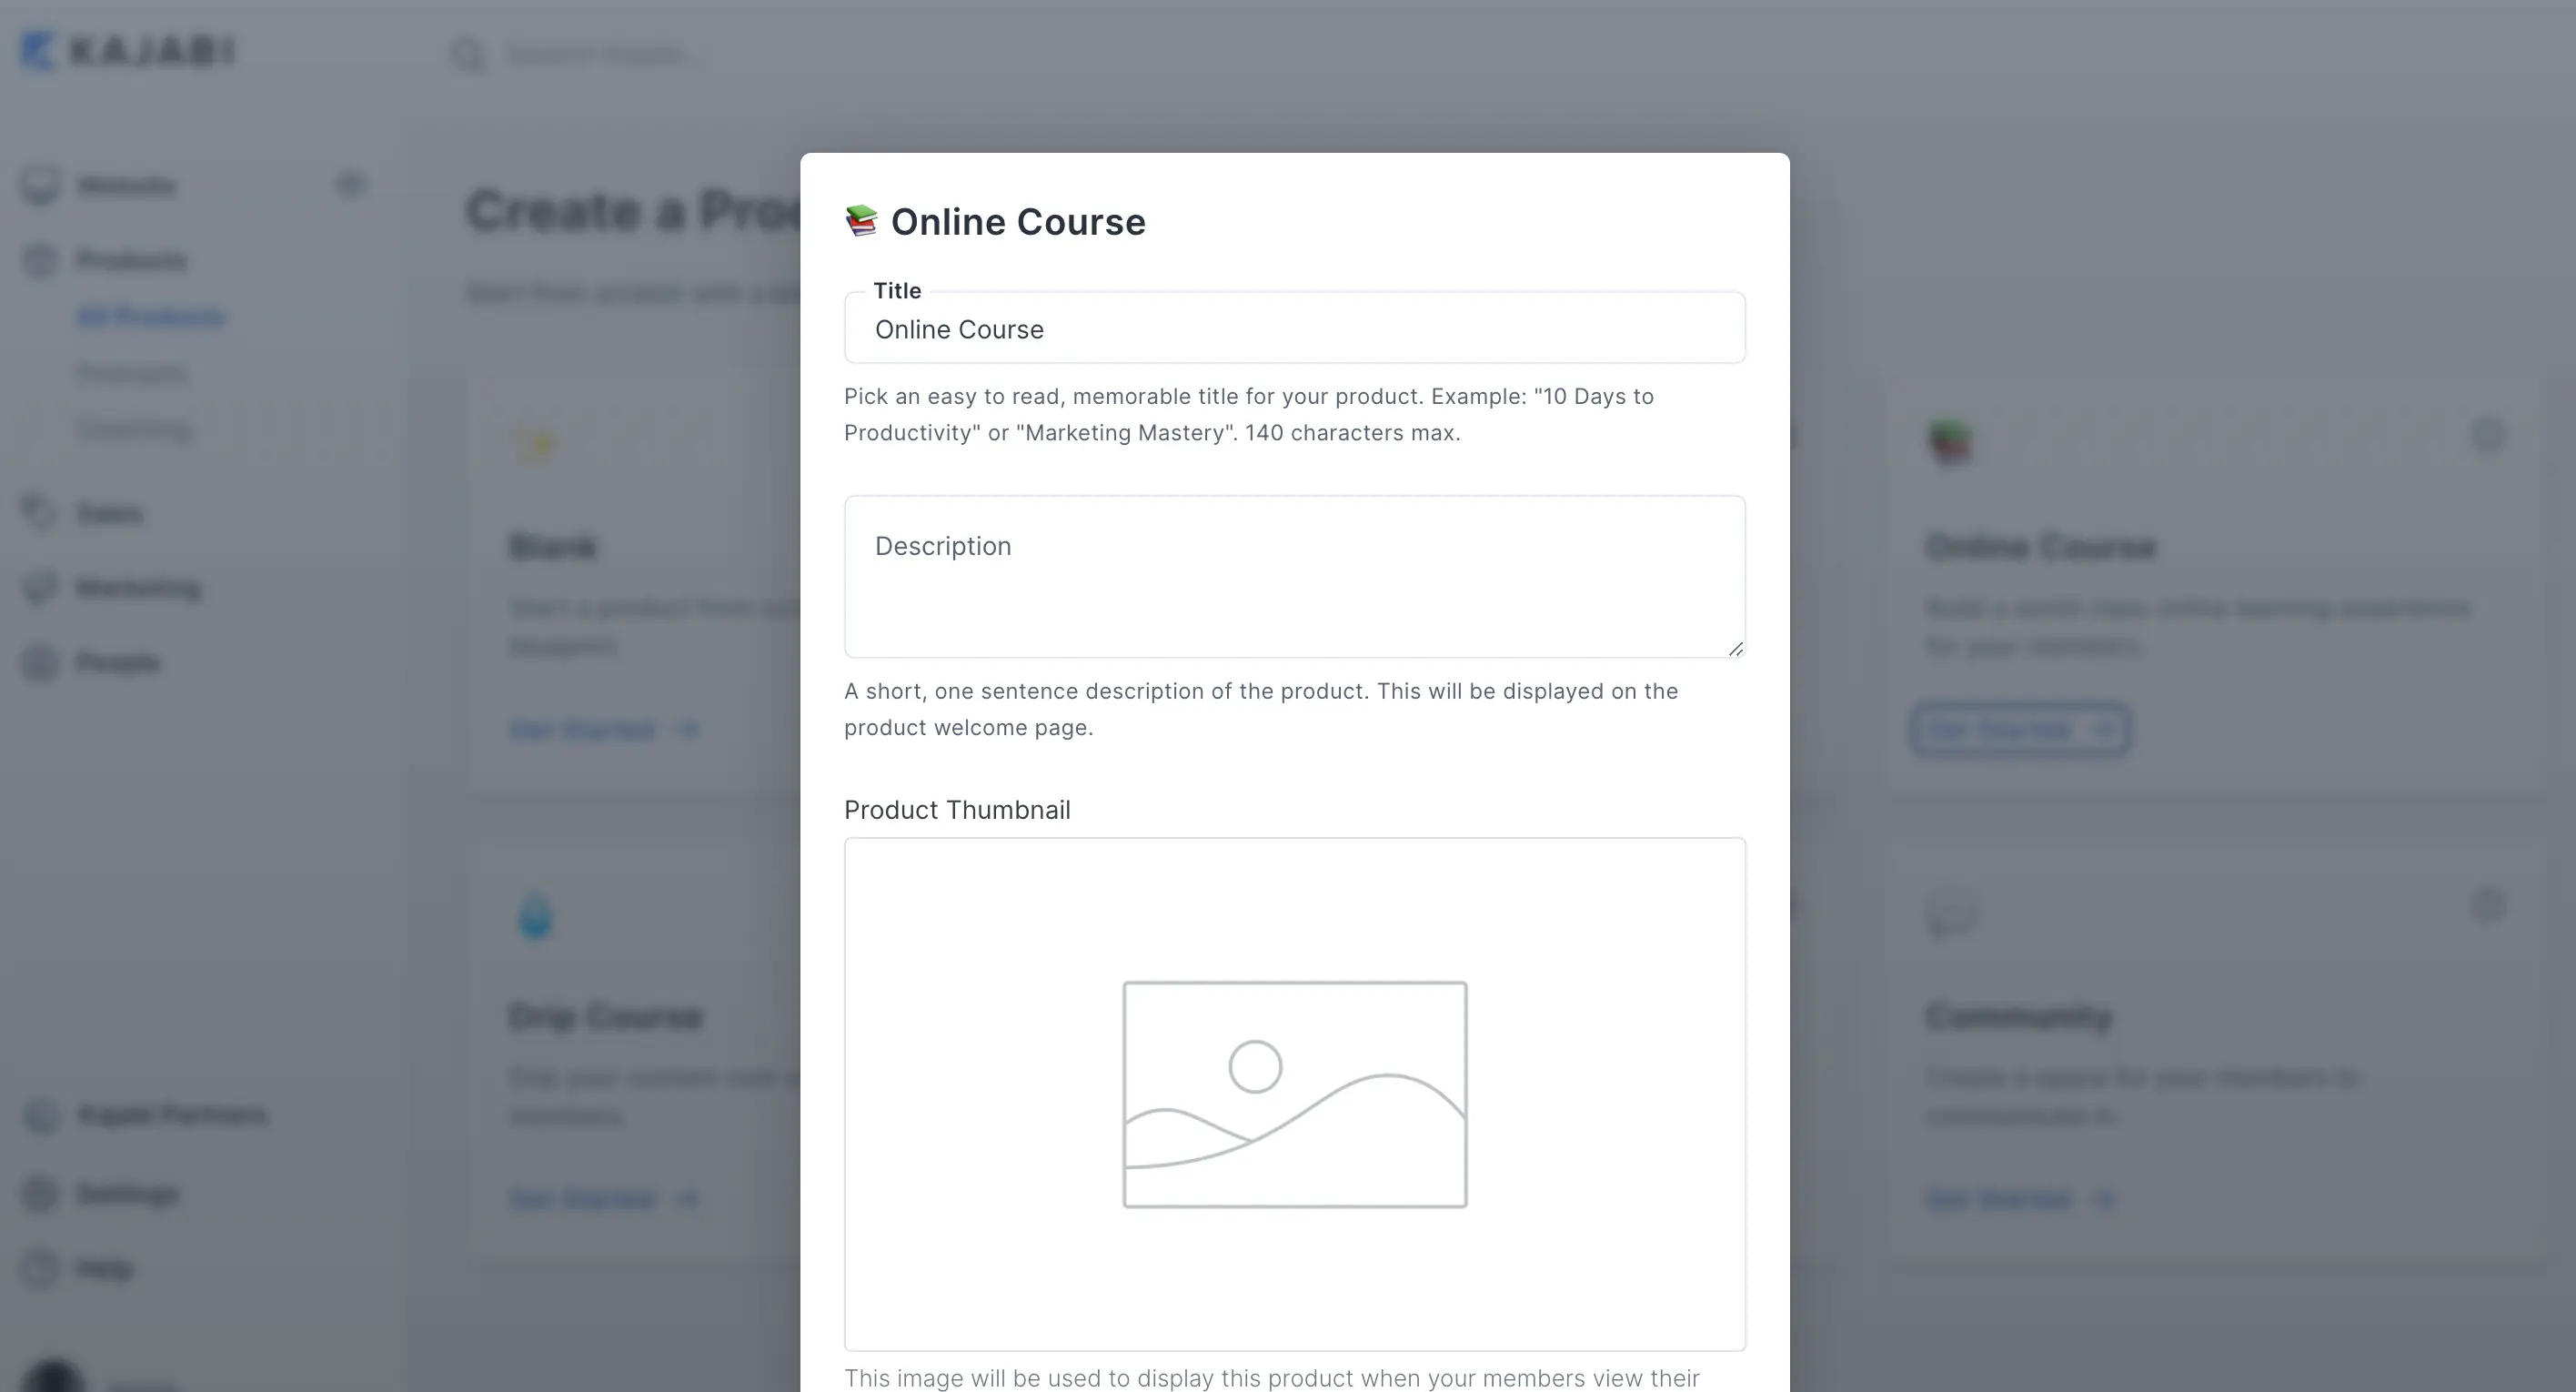
You can choose from different blueprints. We recommend selecting the 'Online Course' blueprint.
You would want to name the product of your course.
Note: This video gives you a better explanation of this process
If my course is "How To Sell Candles Online," we could name the product something like "How To Sell Candles Online - The Beginner Course". You can name the course whatever you'd like. After giving your course a title, be sure to add a description and product thumbnail.
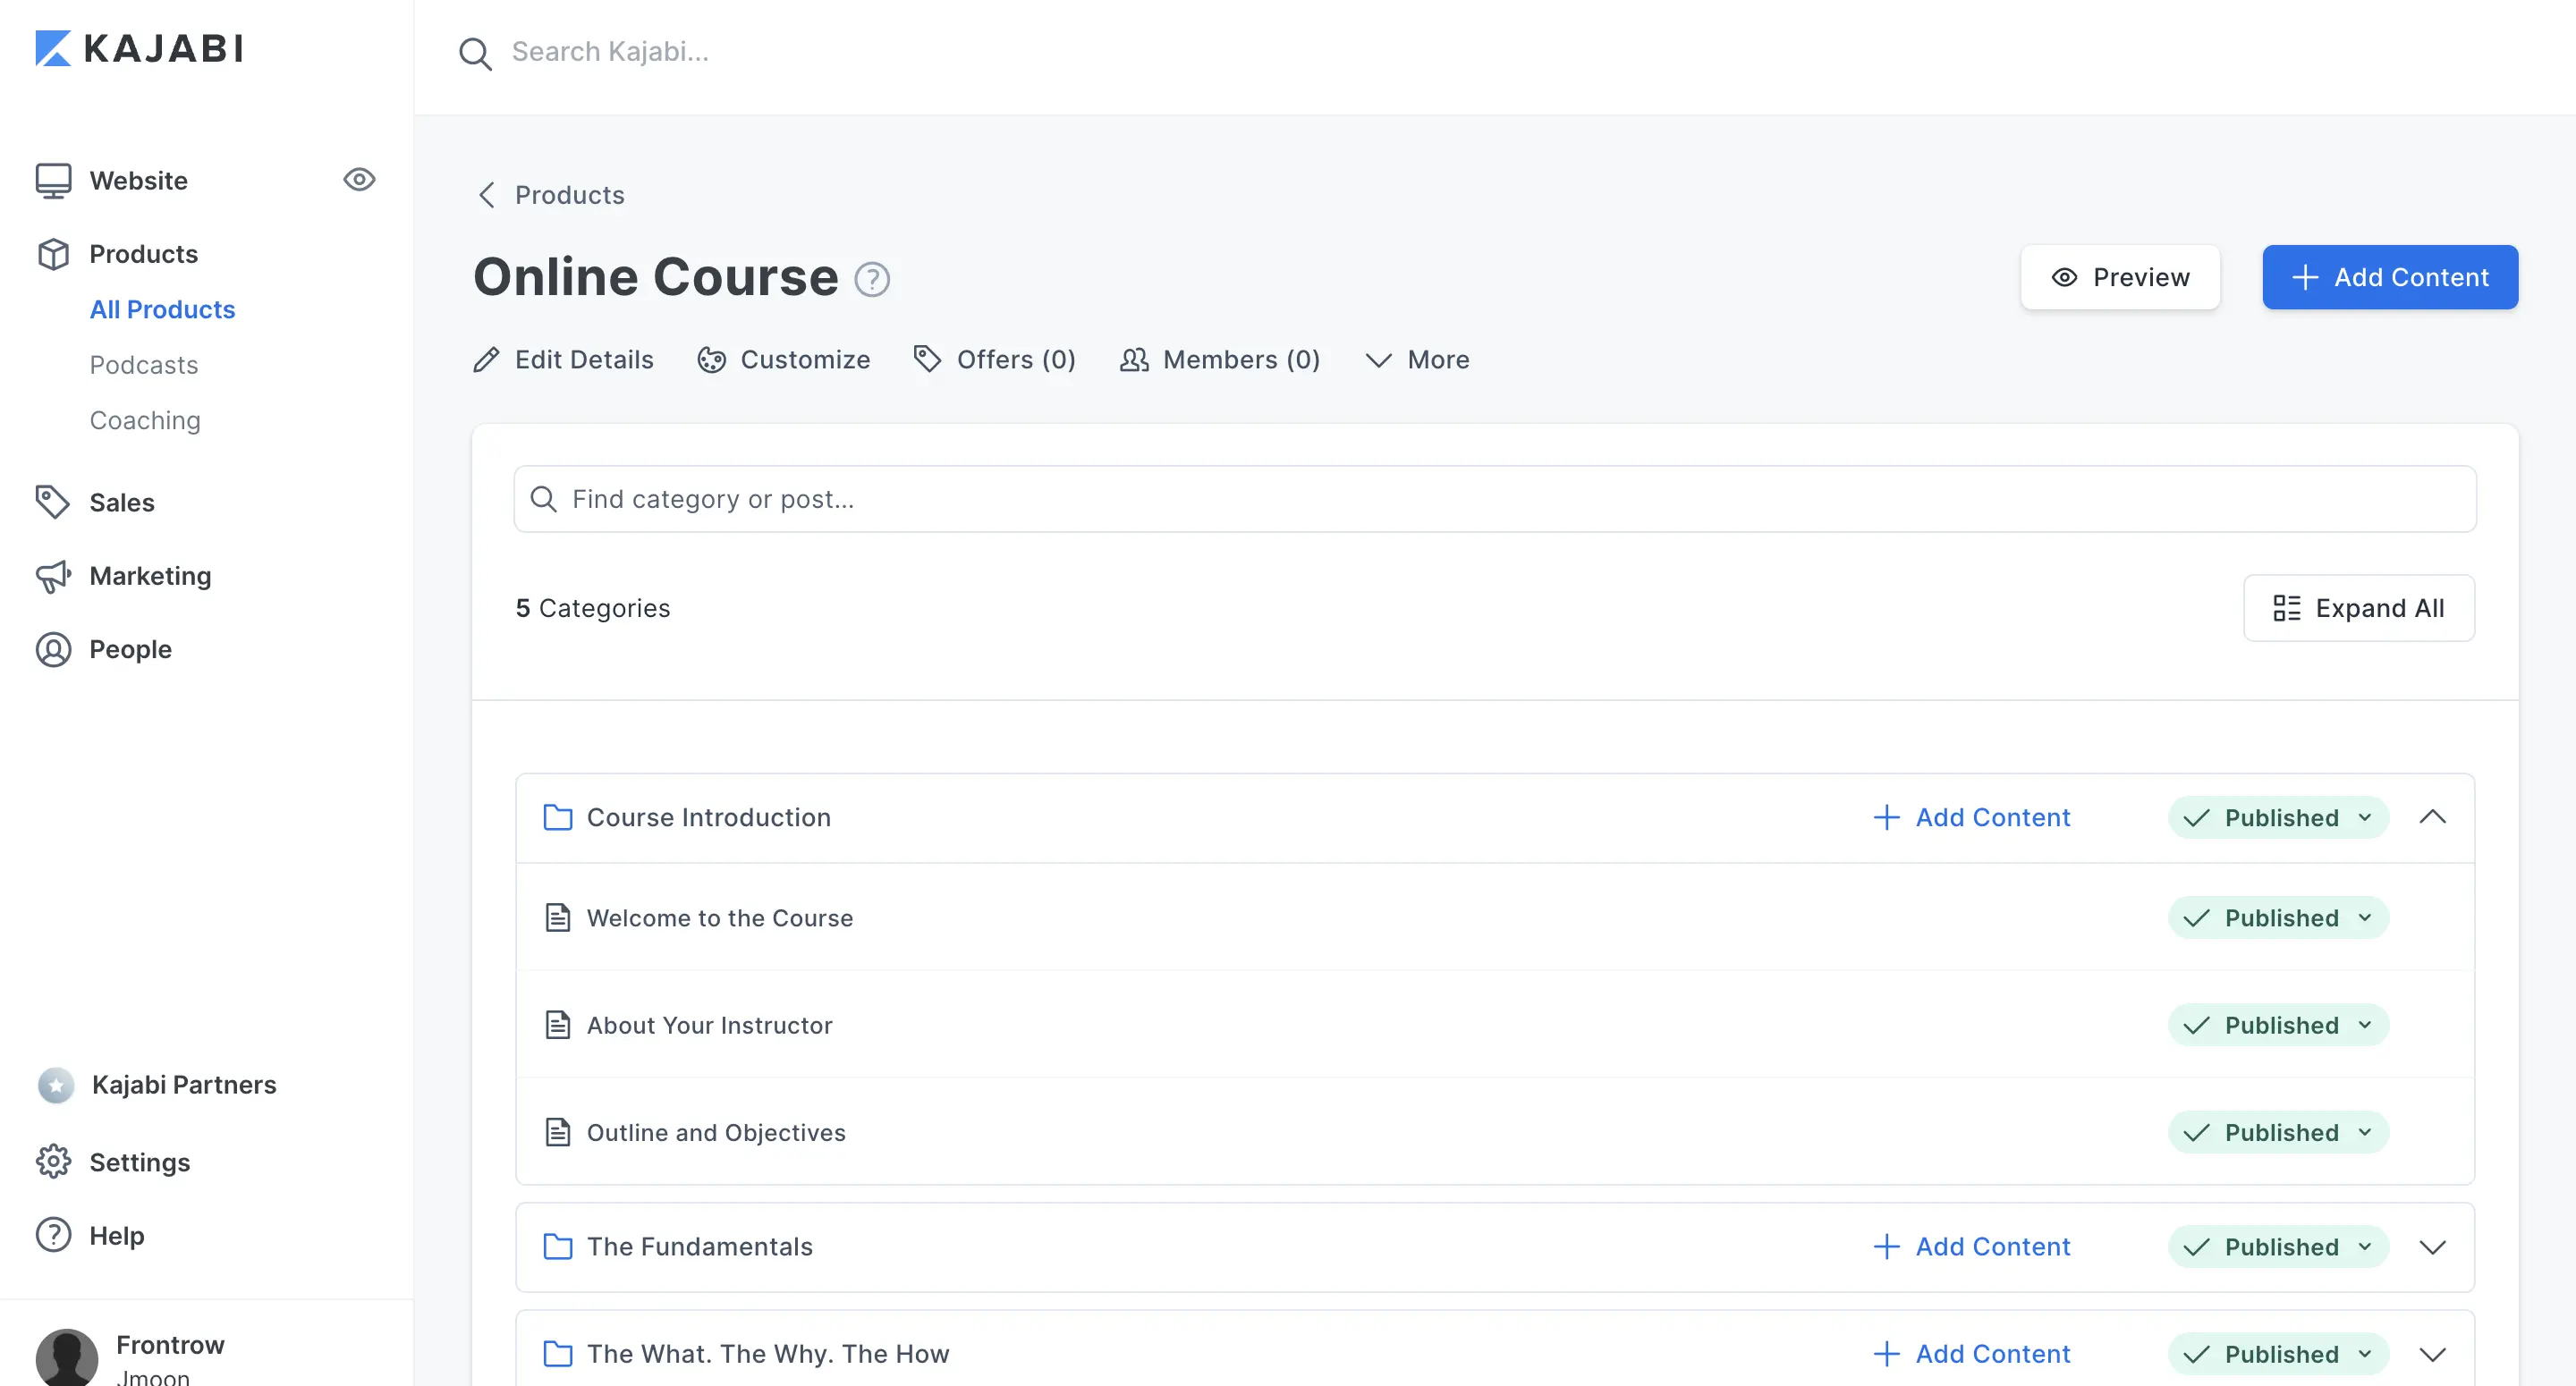
You will then redirect to your new course outline.
In the outline, you can add the different categories of your course and your course's actual content.
You will want to delete the pre-loaded content and add your content.
You will want to upload your video (if you have one) or assessments.
You can also add an image to the content and change any of the body text.
We recommend that you preview the course by click the little eye icon located under the content title.
Once you're done adding your content, click on save.
You will repeat this process until you upload your entire course.
After uploading your course, the next step is to click on 'Offers' in the left-hand menu.
Create a new offer by click 'New Offer.'
Give the offer a title, associate the product (your course), and give your offer a price (the price of your course).
Then click Save.
Selling Courses On Your Website
Now that you created your website and created your course in Kajabi, it's time to sell it!
You could sell your course on Kajabi, but it lacks some customizability and functionality.
It's better to sell on Webflow following the steps we are going to outline below.
Now that you have your course in Kajabi and your site in Webflow, it's time to set up your payment form.
We are going to use a tool called Cartfuel.
Cartfuel is a payment form builder that allows you to sell online, and it has direct integration with Kajabi.

This means that you will be able to sell your course using Cartfuel and have your customers sent to Kajabi.
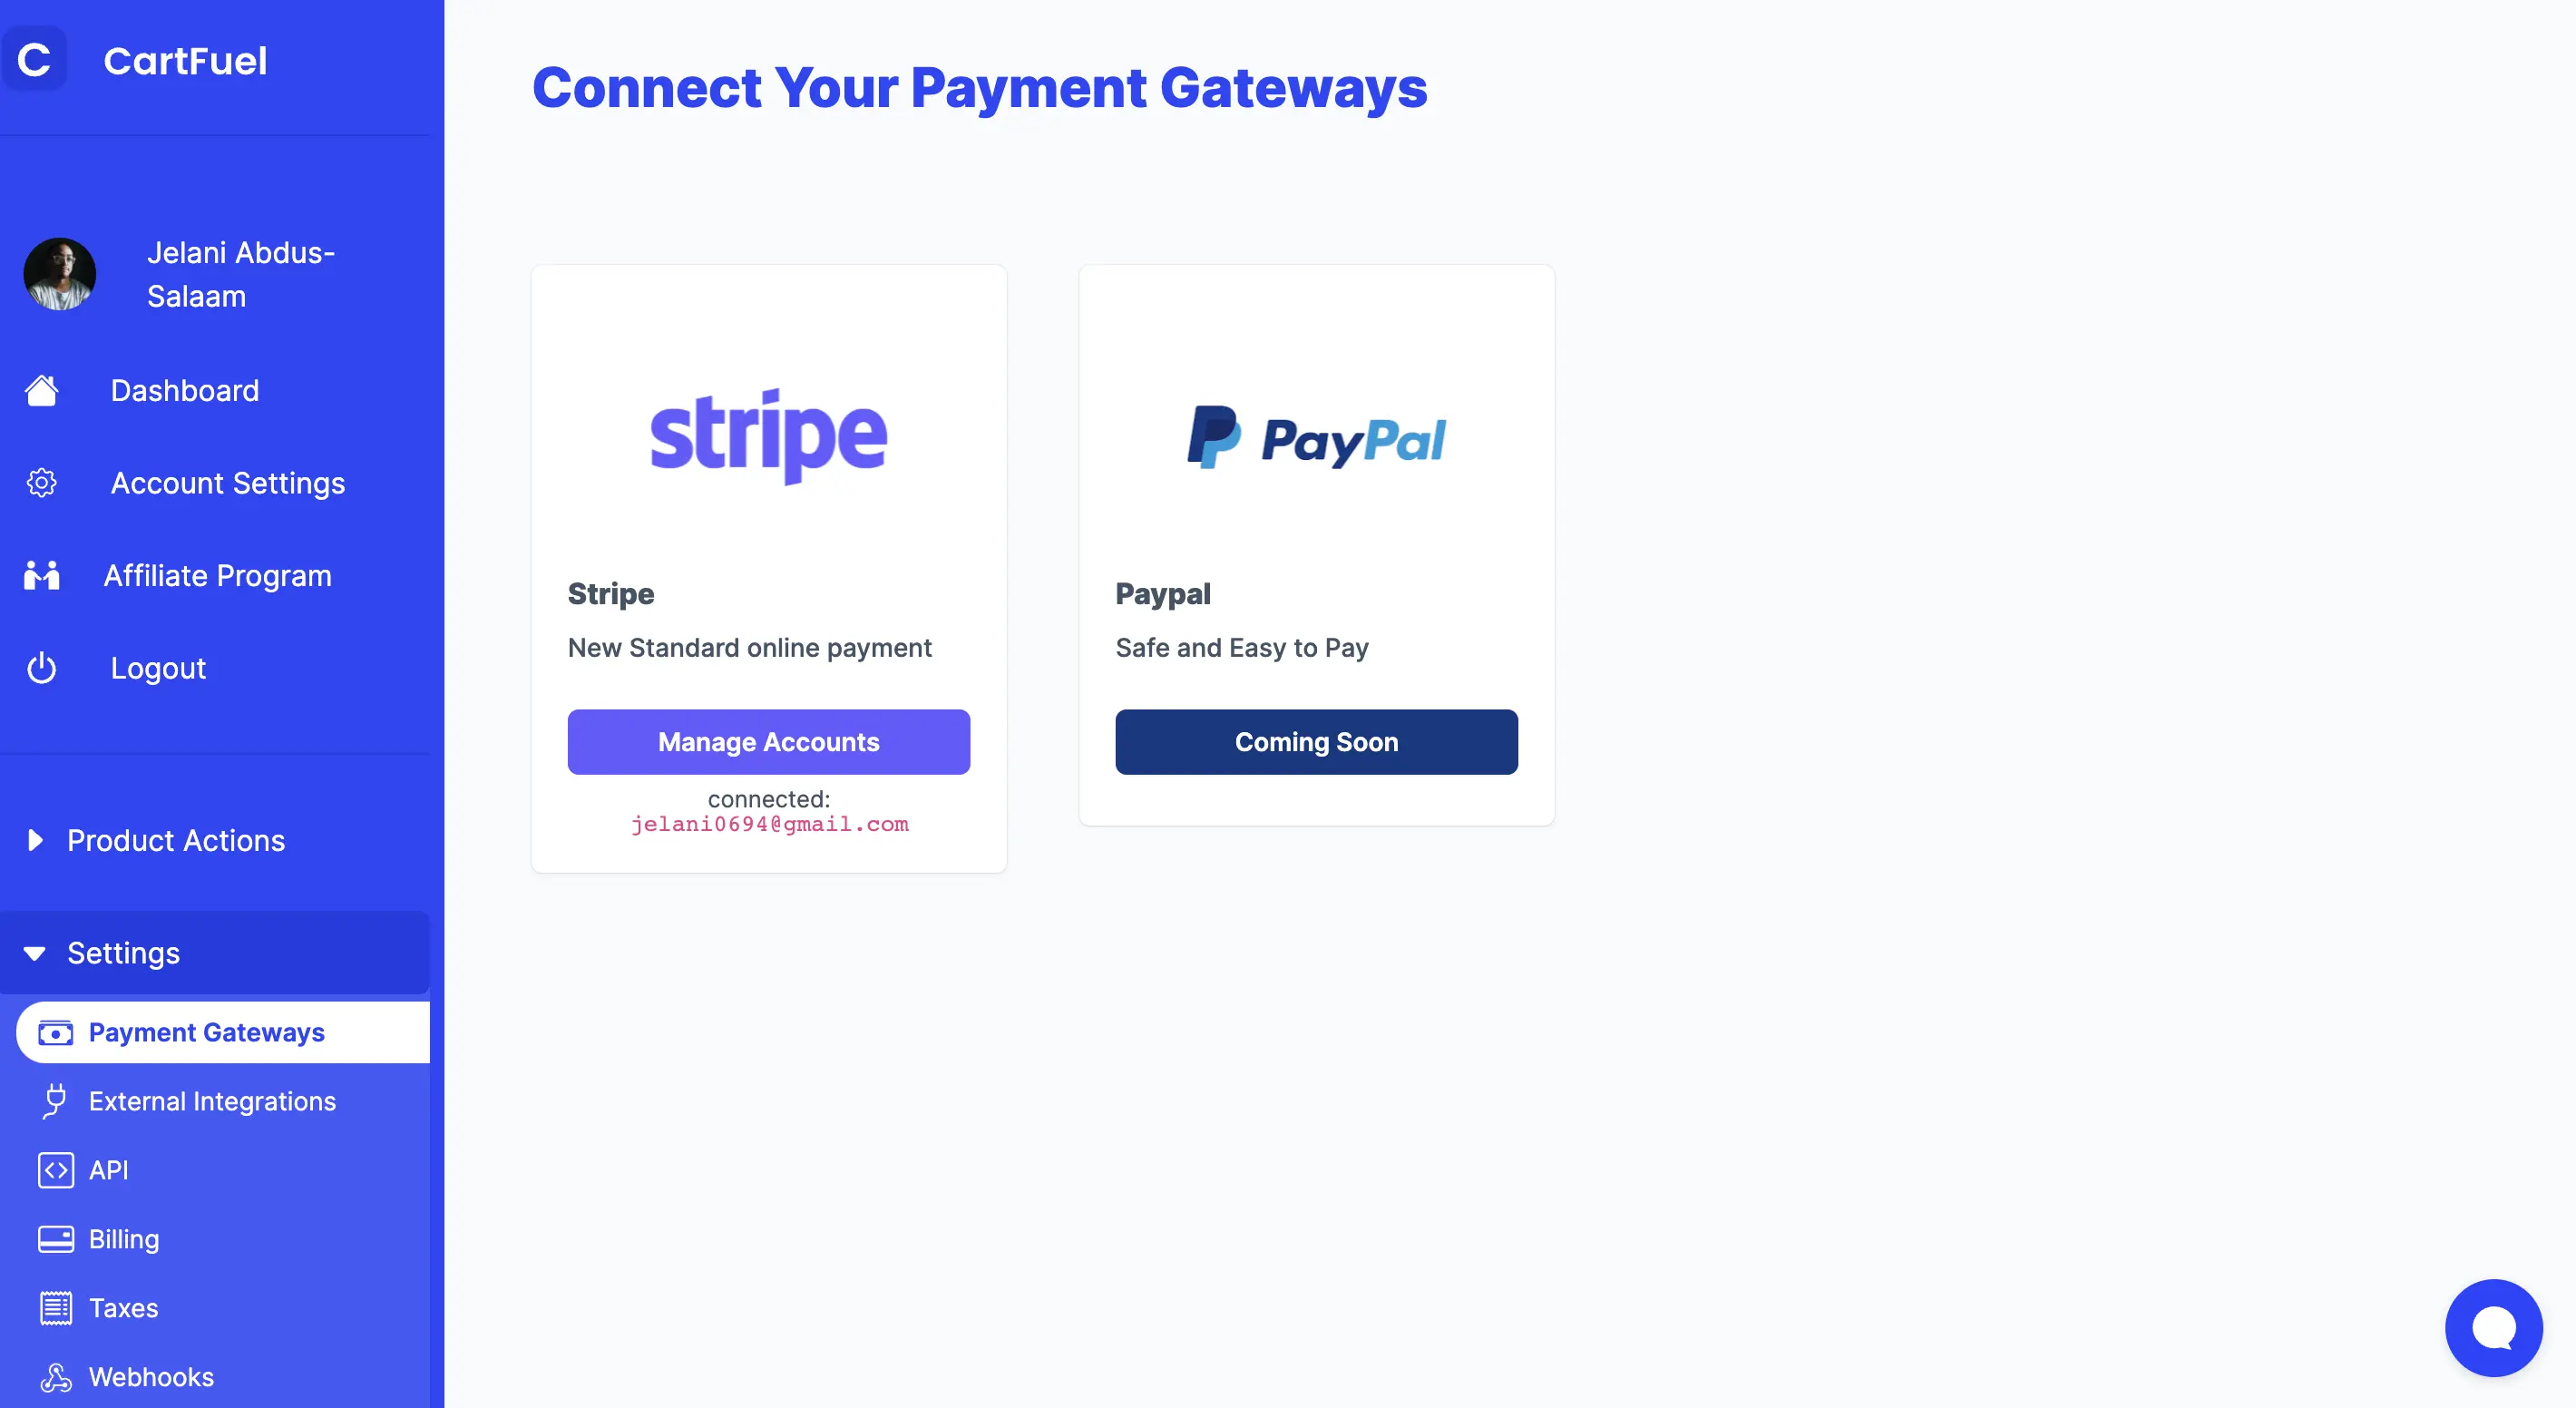
Go to Cartfuel.io and sign up for an account.
Please note: You will need a Stripe account. Stripe is free to use and connects to your bank account so that you can accept B2B payments online. Read more on setting up a Stripe account with How To Create A Stripe Payment Form For Your Website.
Once you sign up, you will want to connect your Stripe Account.
Before we set up your payment form, we need to connect Kajabi to Cartfuel.
To do so, click 'External Integrations'.

Then you will click the Kajabi icon. From there, a popup will show up, and you will enter the name of your course and the checkout webhook URL.
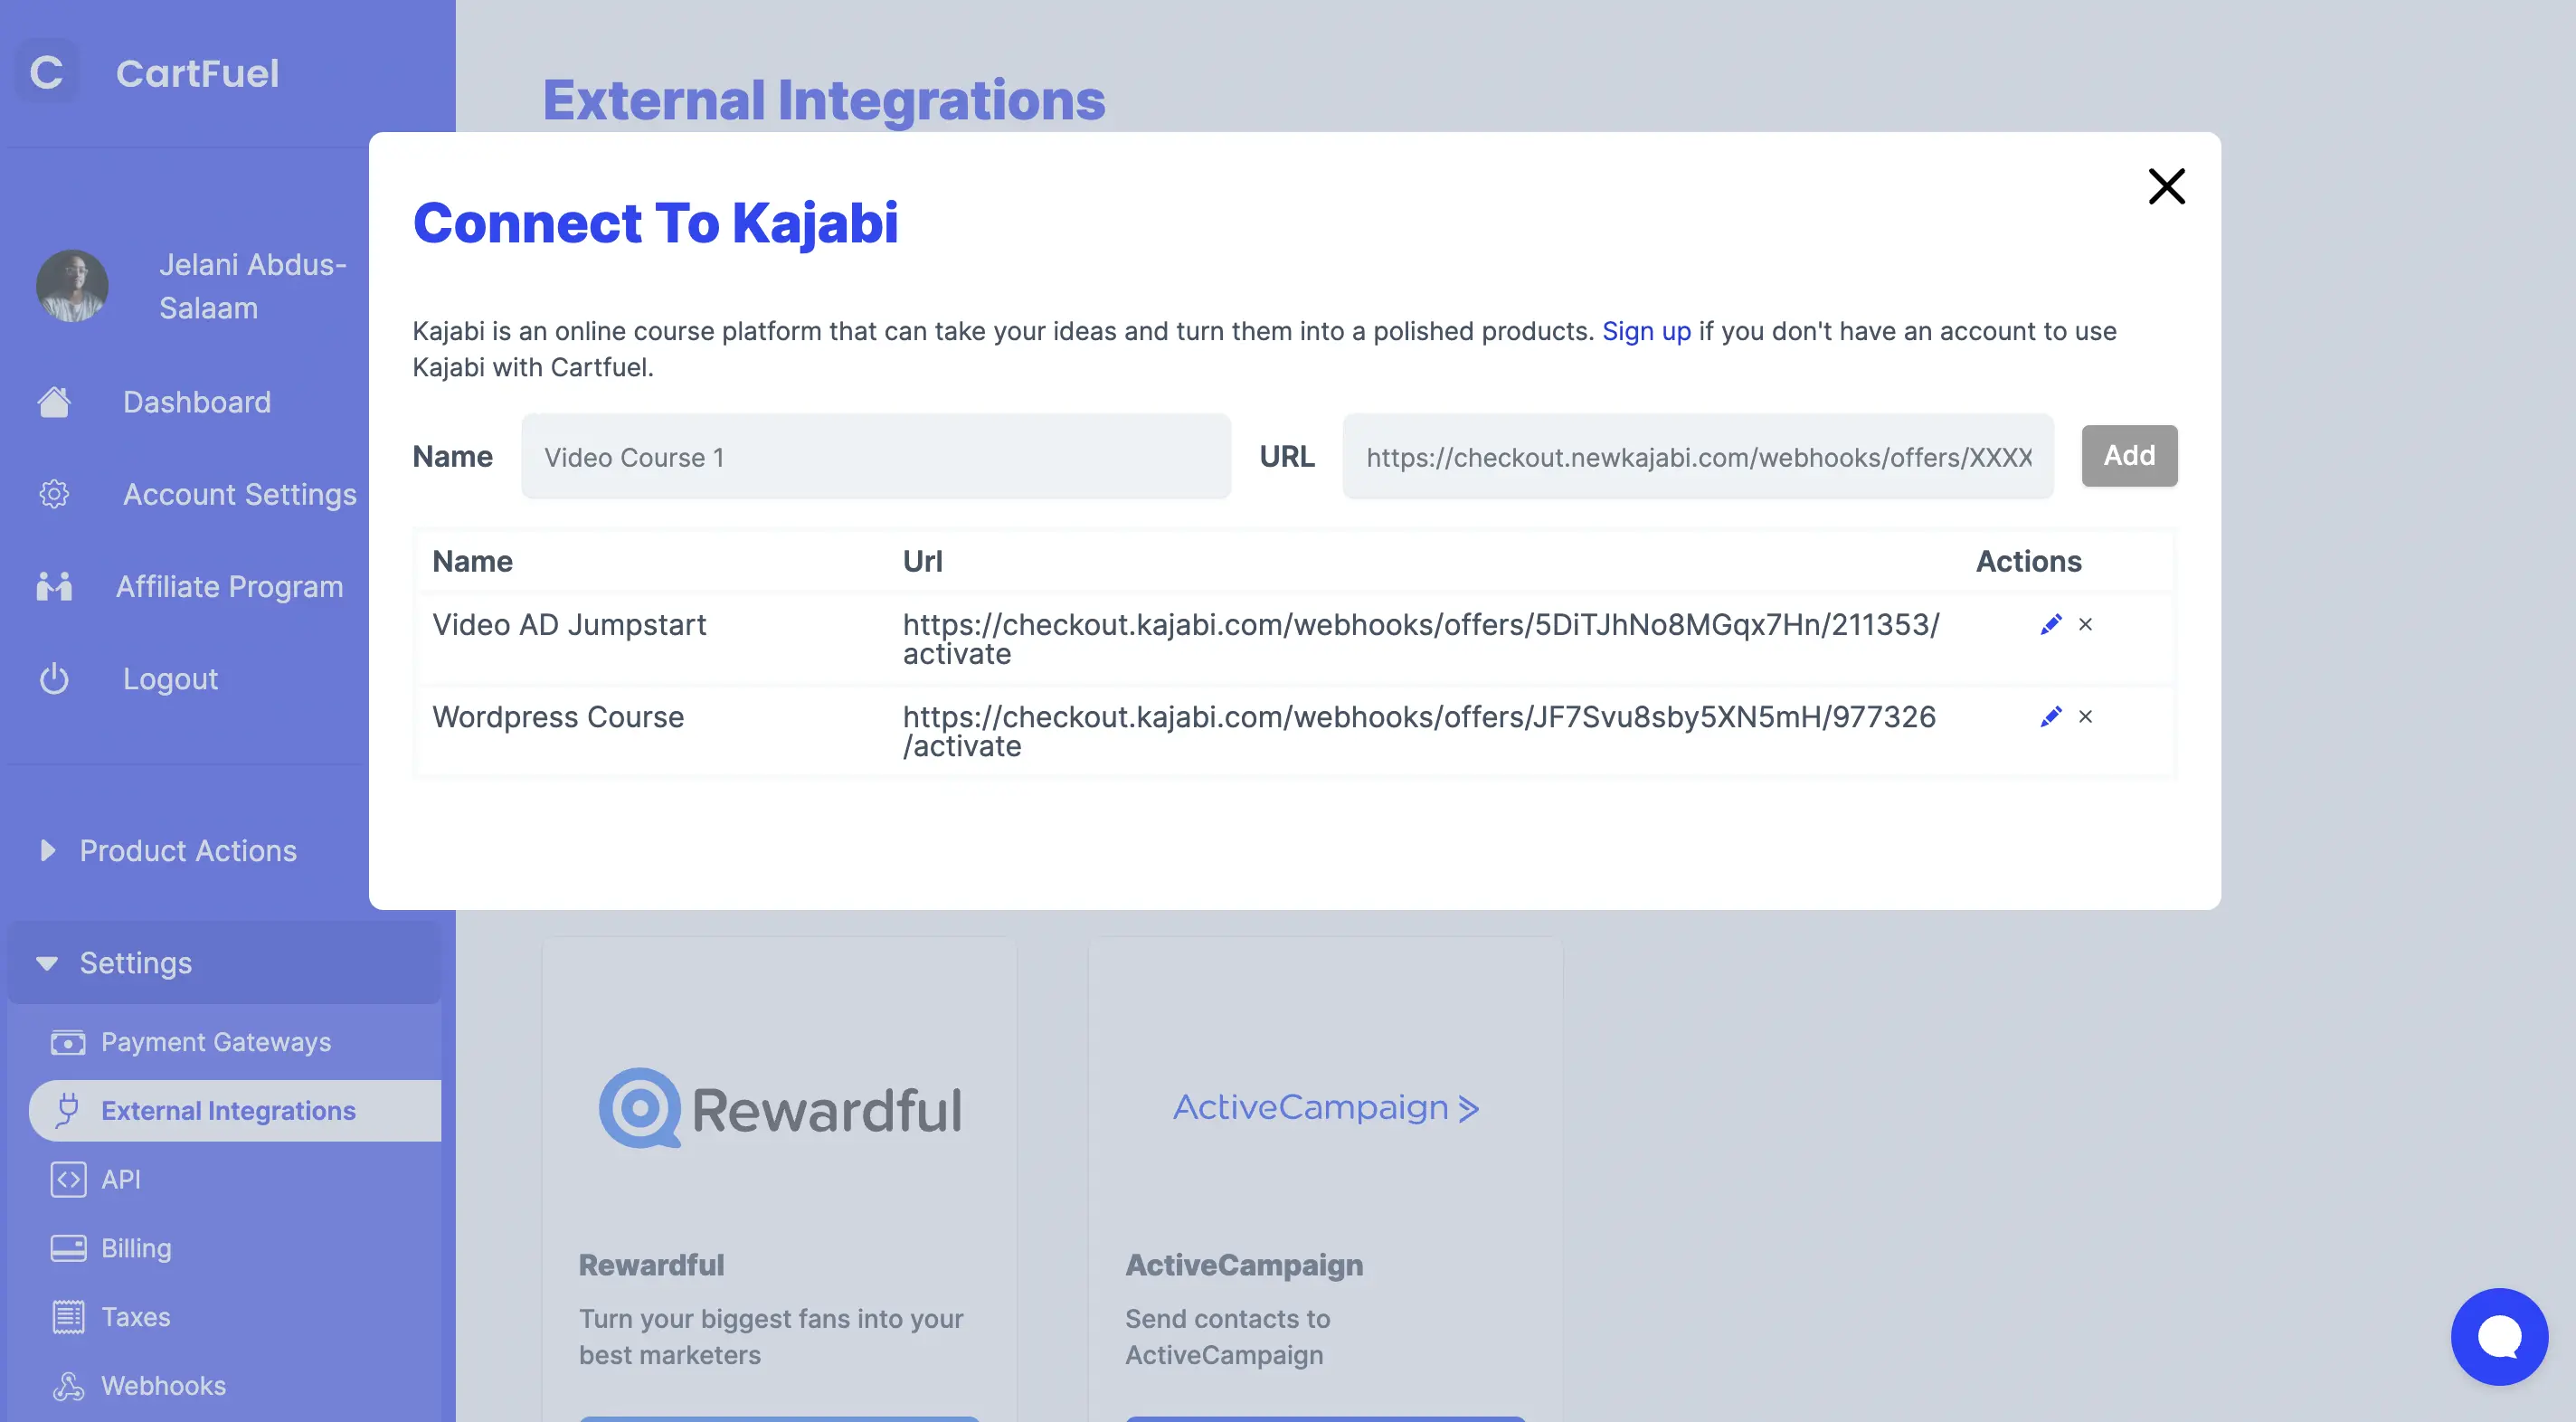
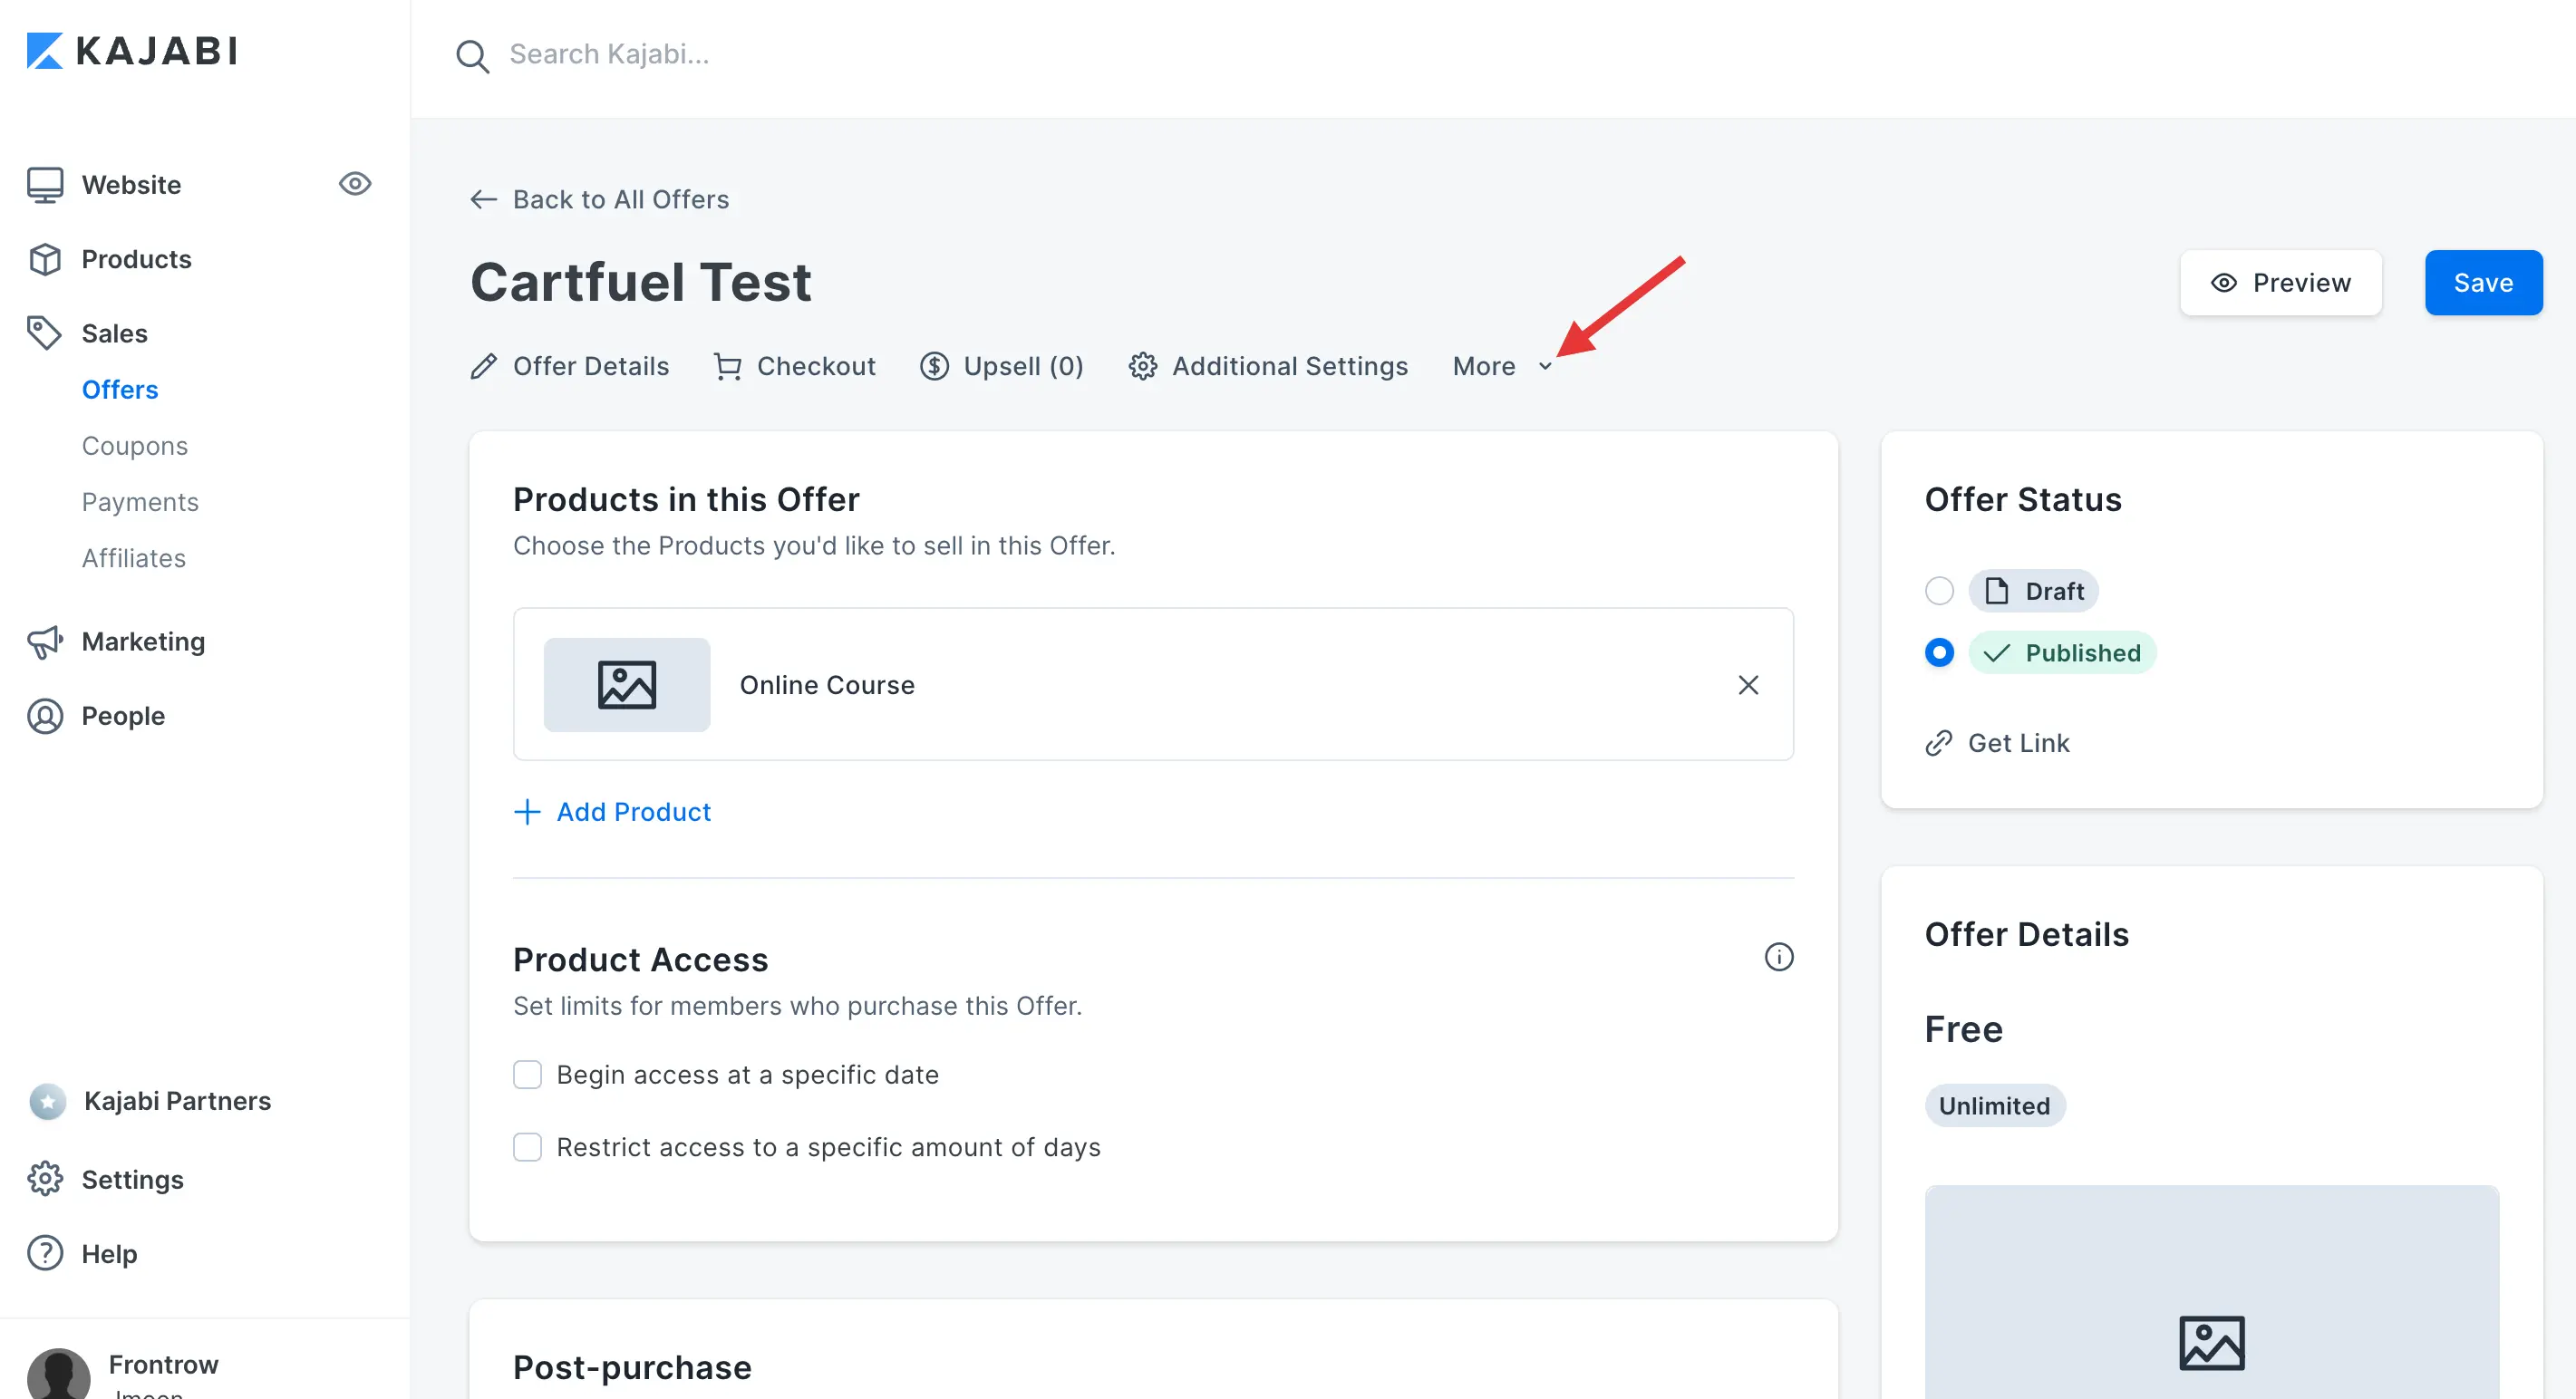
You can find your checkout URL by going to your Kajabi account and clicking 'Offers' in the left-hand menu.
Then select the offer you created before.
Once you click that, you will then click 'More' under your course title.
Then click 'Webhooks.' Copy the activation URL.
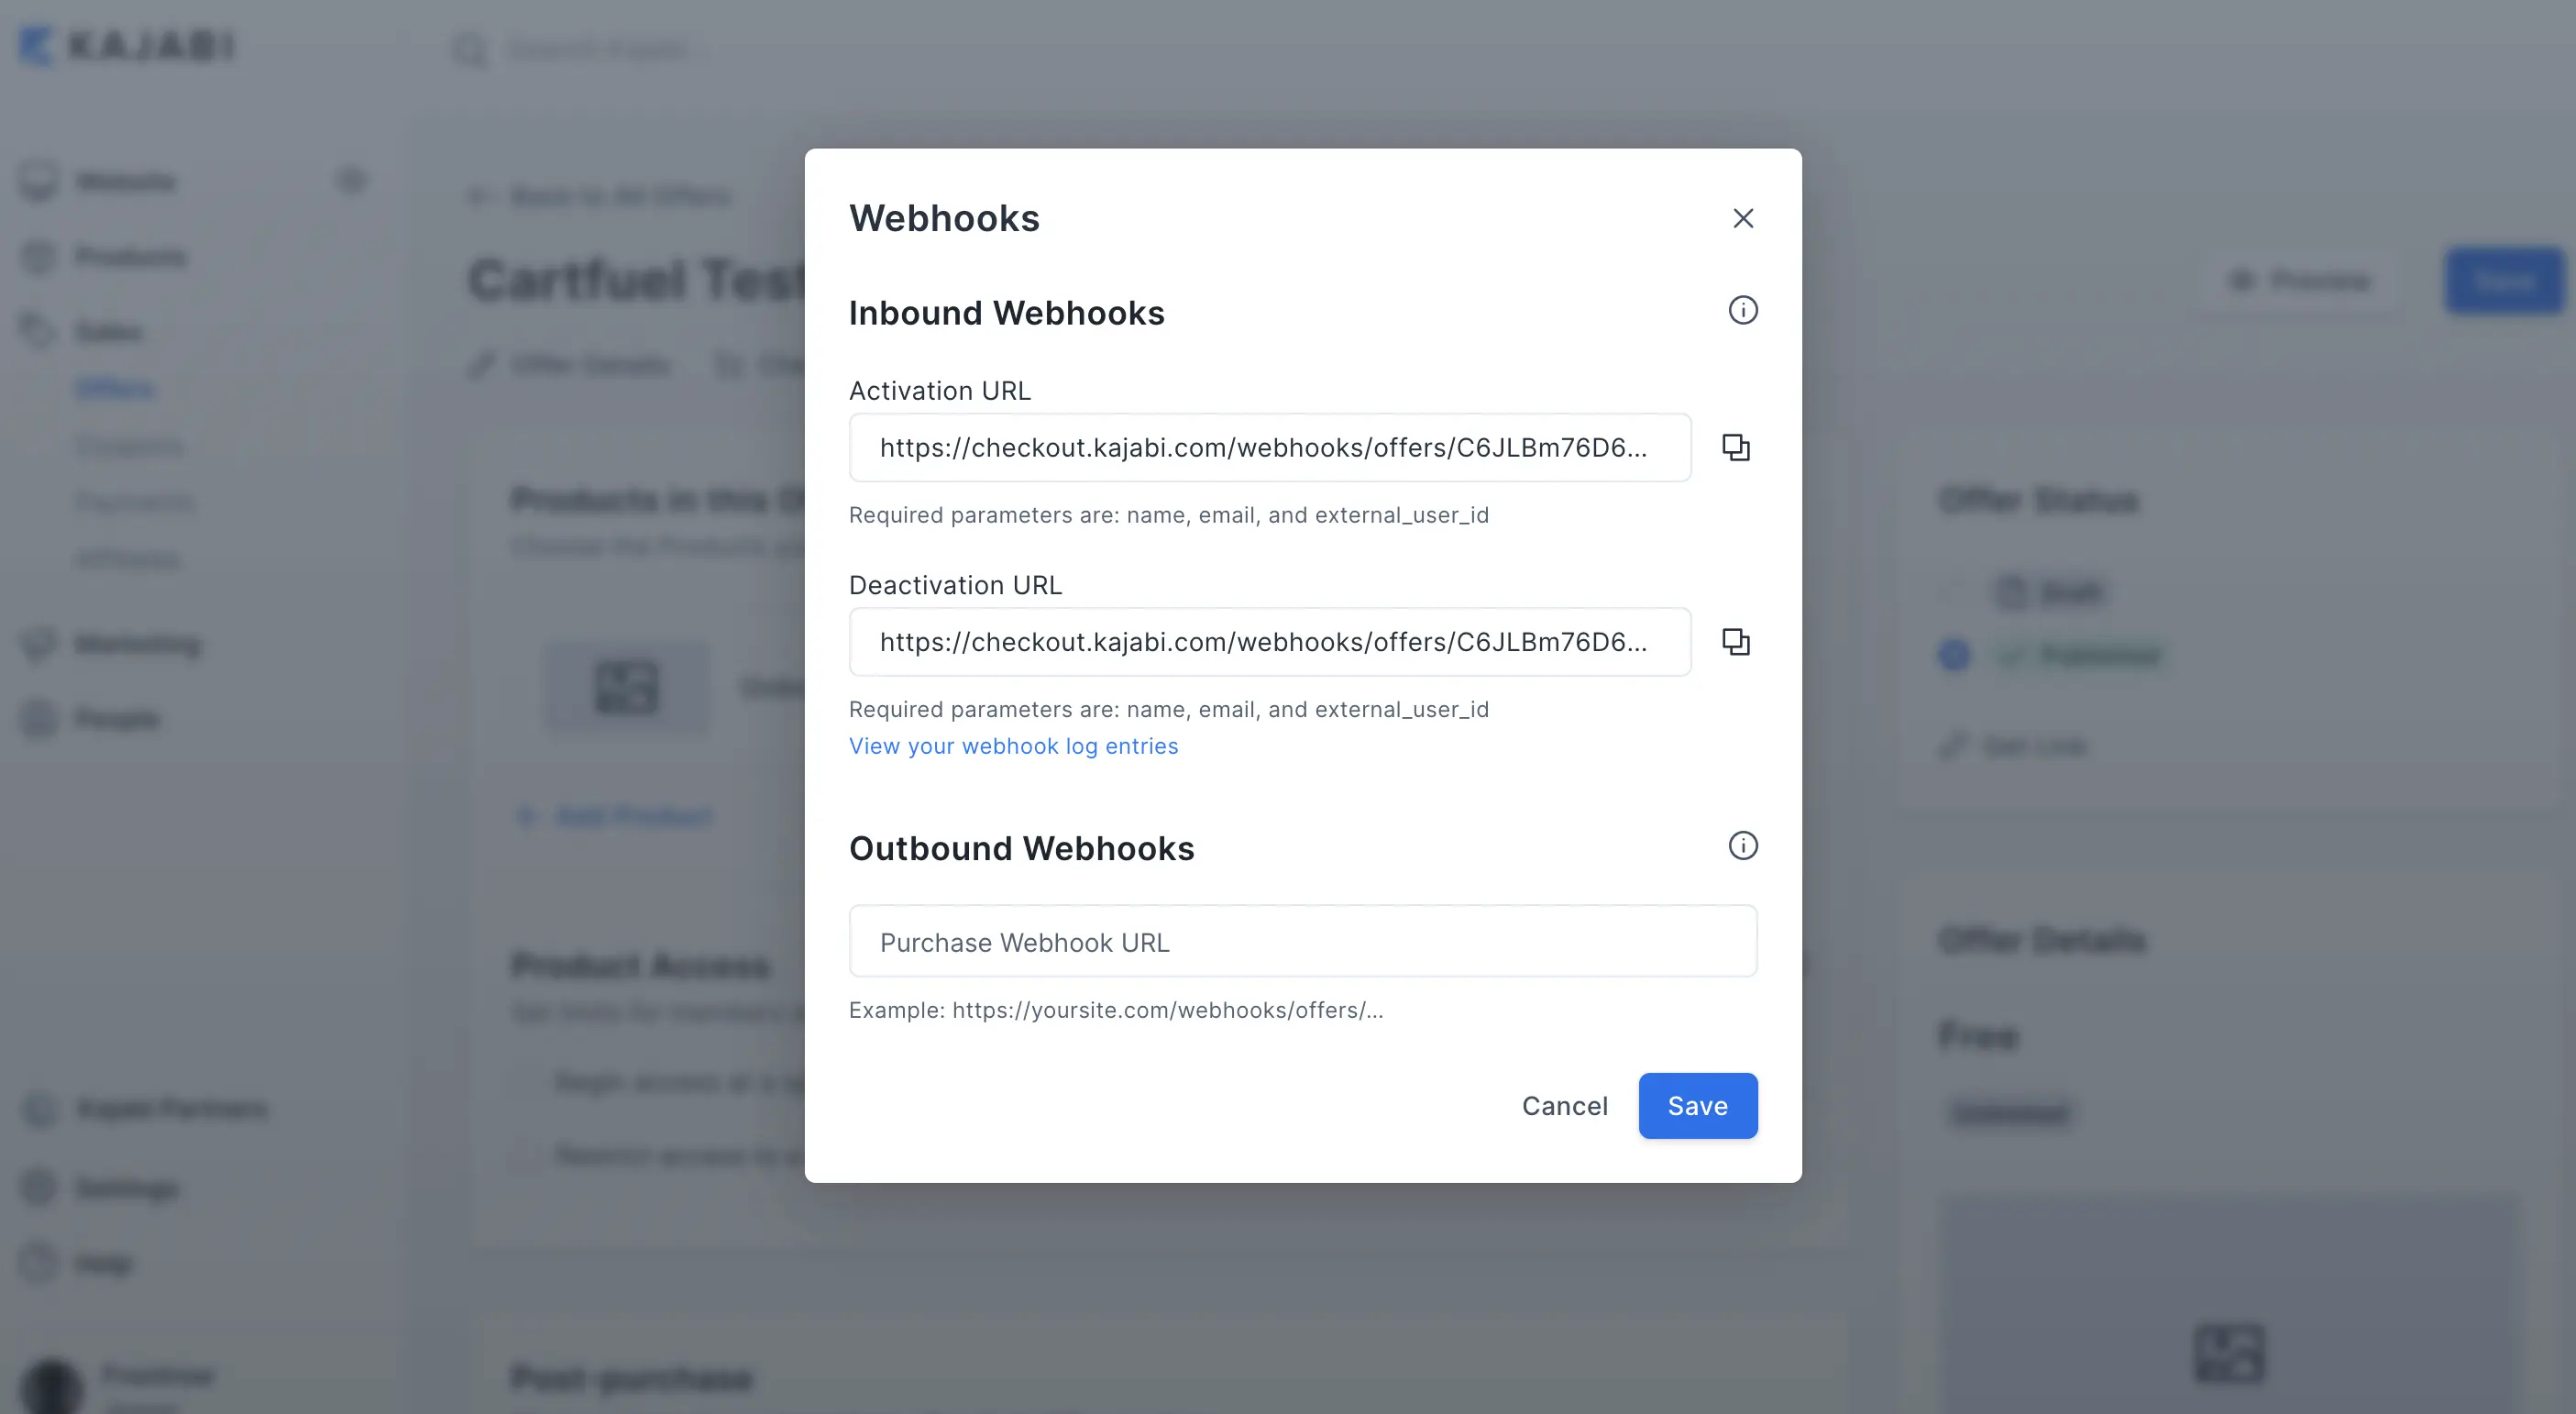
Then go back to Cartfuel and paste that URL inside of the URL box.
Then click add.

Now we can create our first Product in Cartfuel.
Click the 'New Product Sequence' Menu Item on the left-hand side.
A sequence of products is what we call our payment forms and upsells.
Click to add a new product sequence.
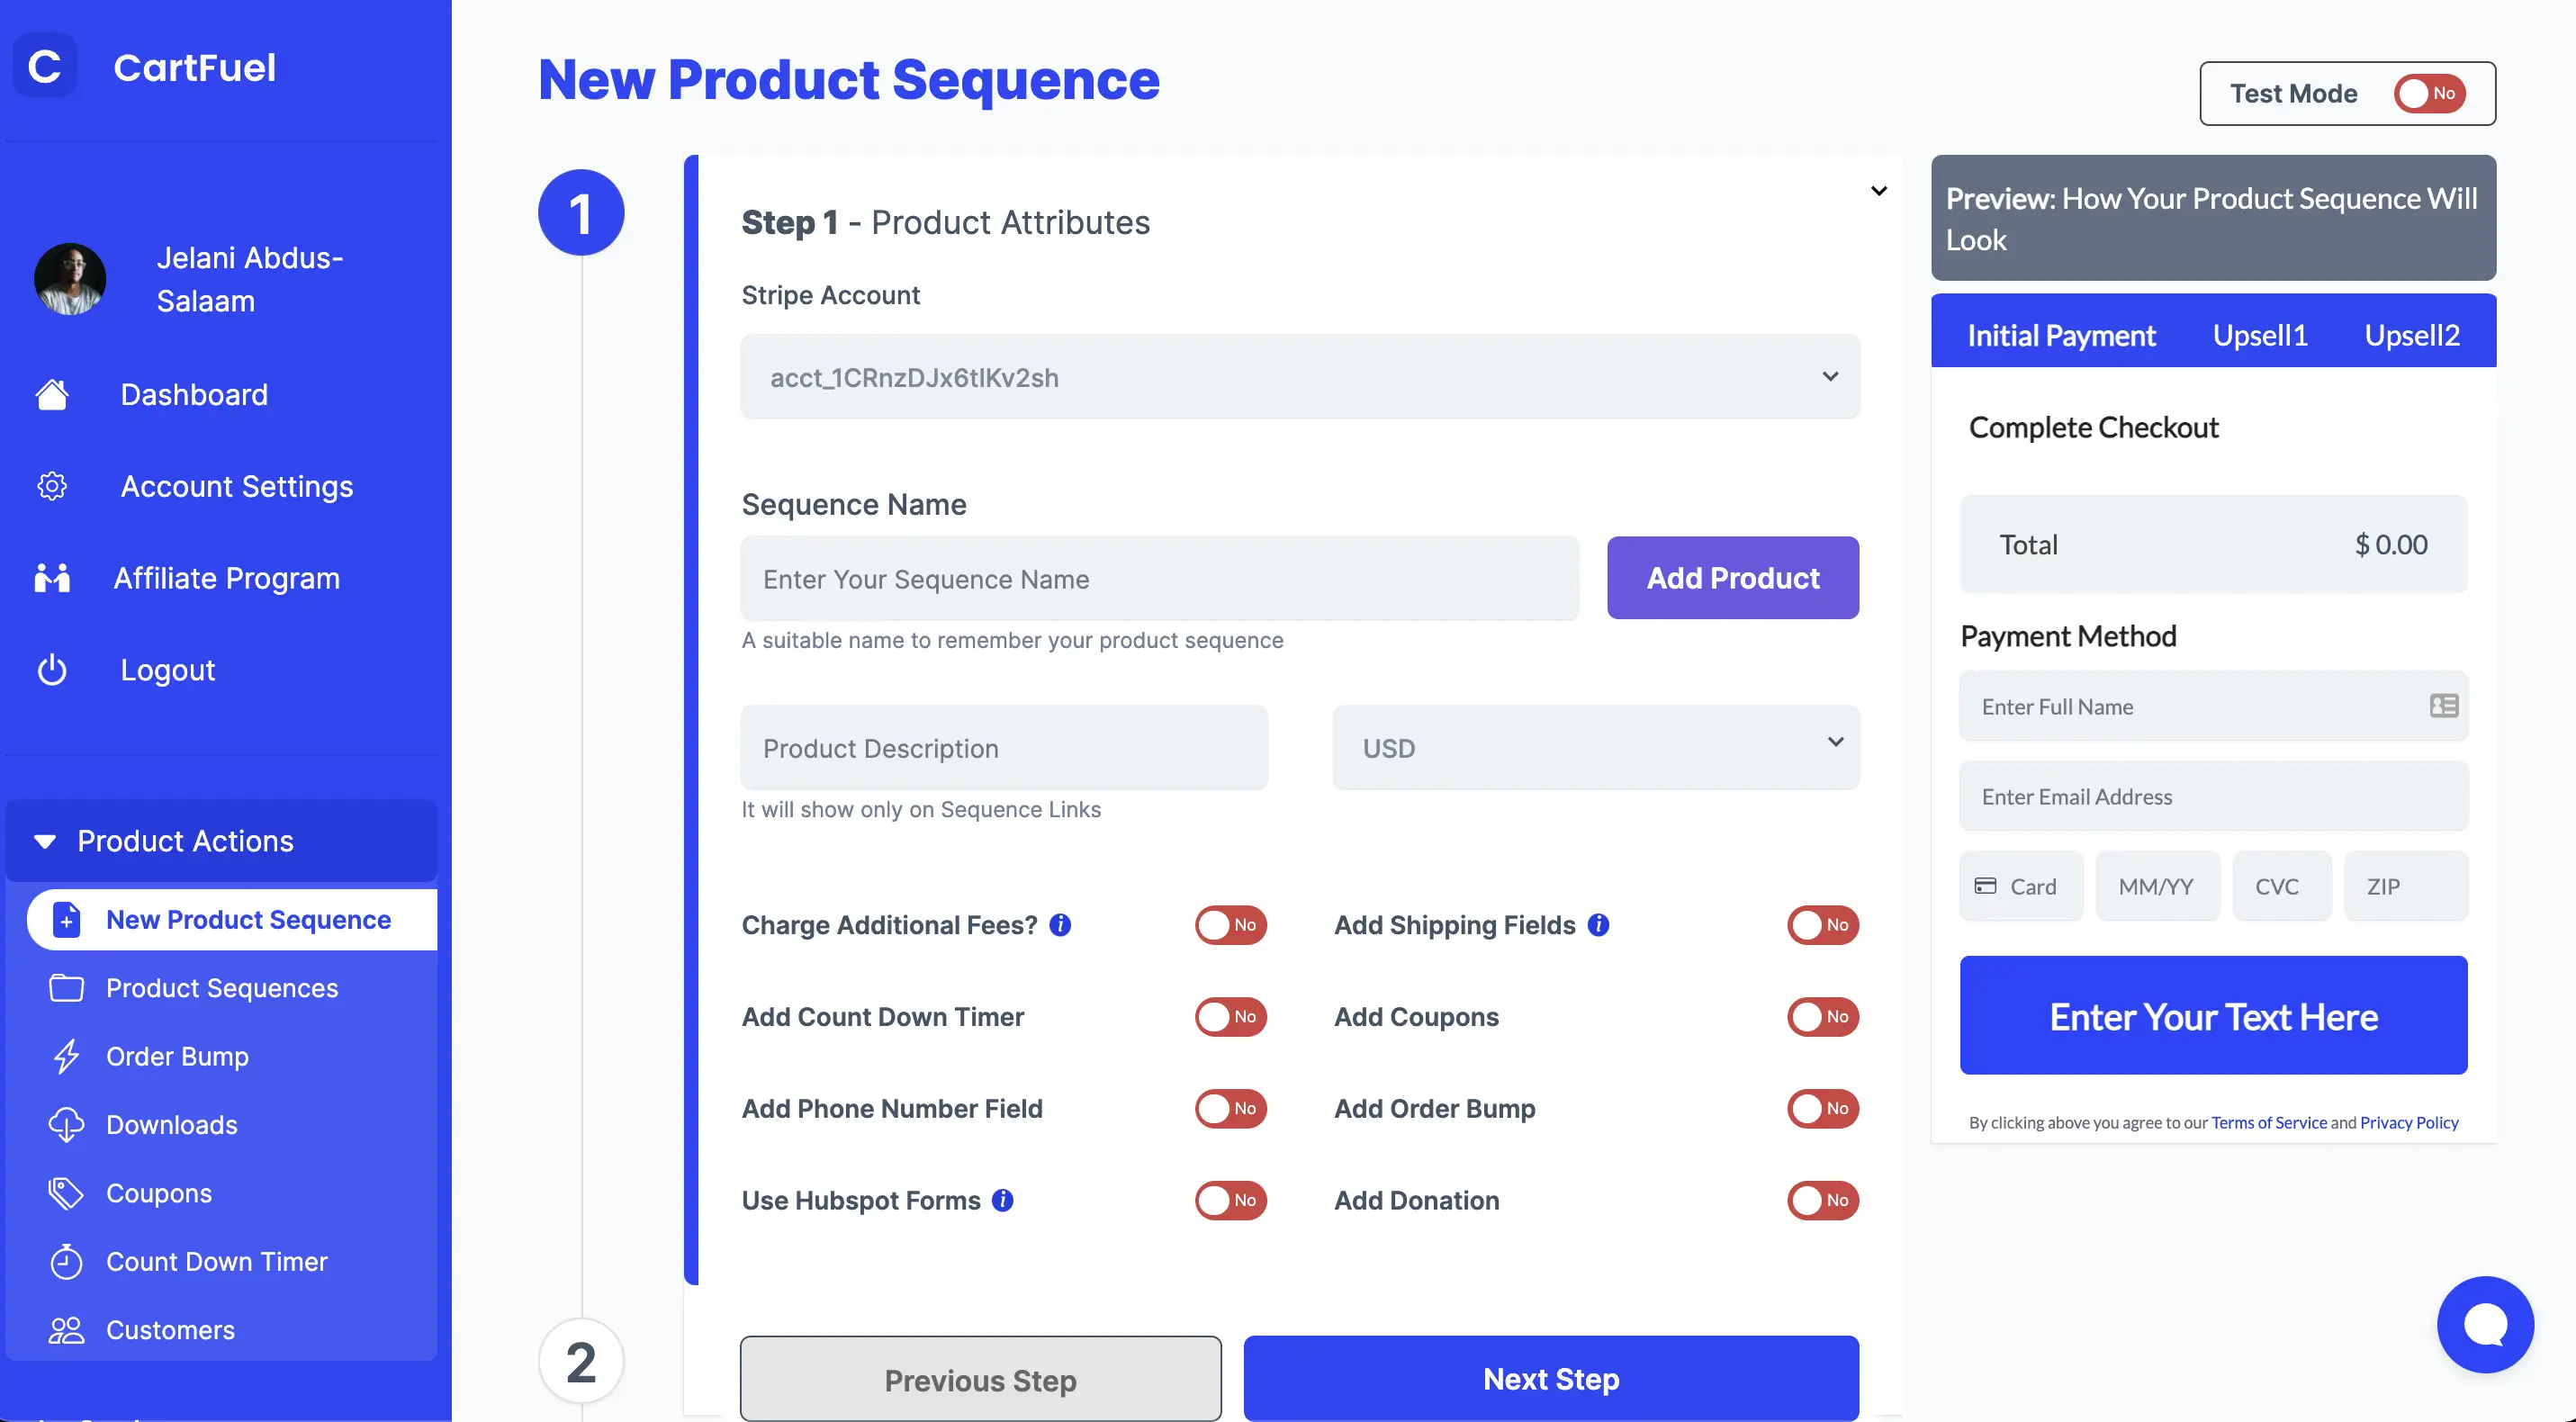
Give a name to your product (the name of your course).
Give a price to your product (the cost of your course).
If you want to sell recurring products, see this article to learn how to do it.
Choose if you want to charge extra fees if you're going to add a quantity field, add a coupon, add an order bump, or countdown timer if you charge taxes.
After adding the extra features to your payment form, you will want to scroll to the second step.
In the second step you will be able to customize your payment form.
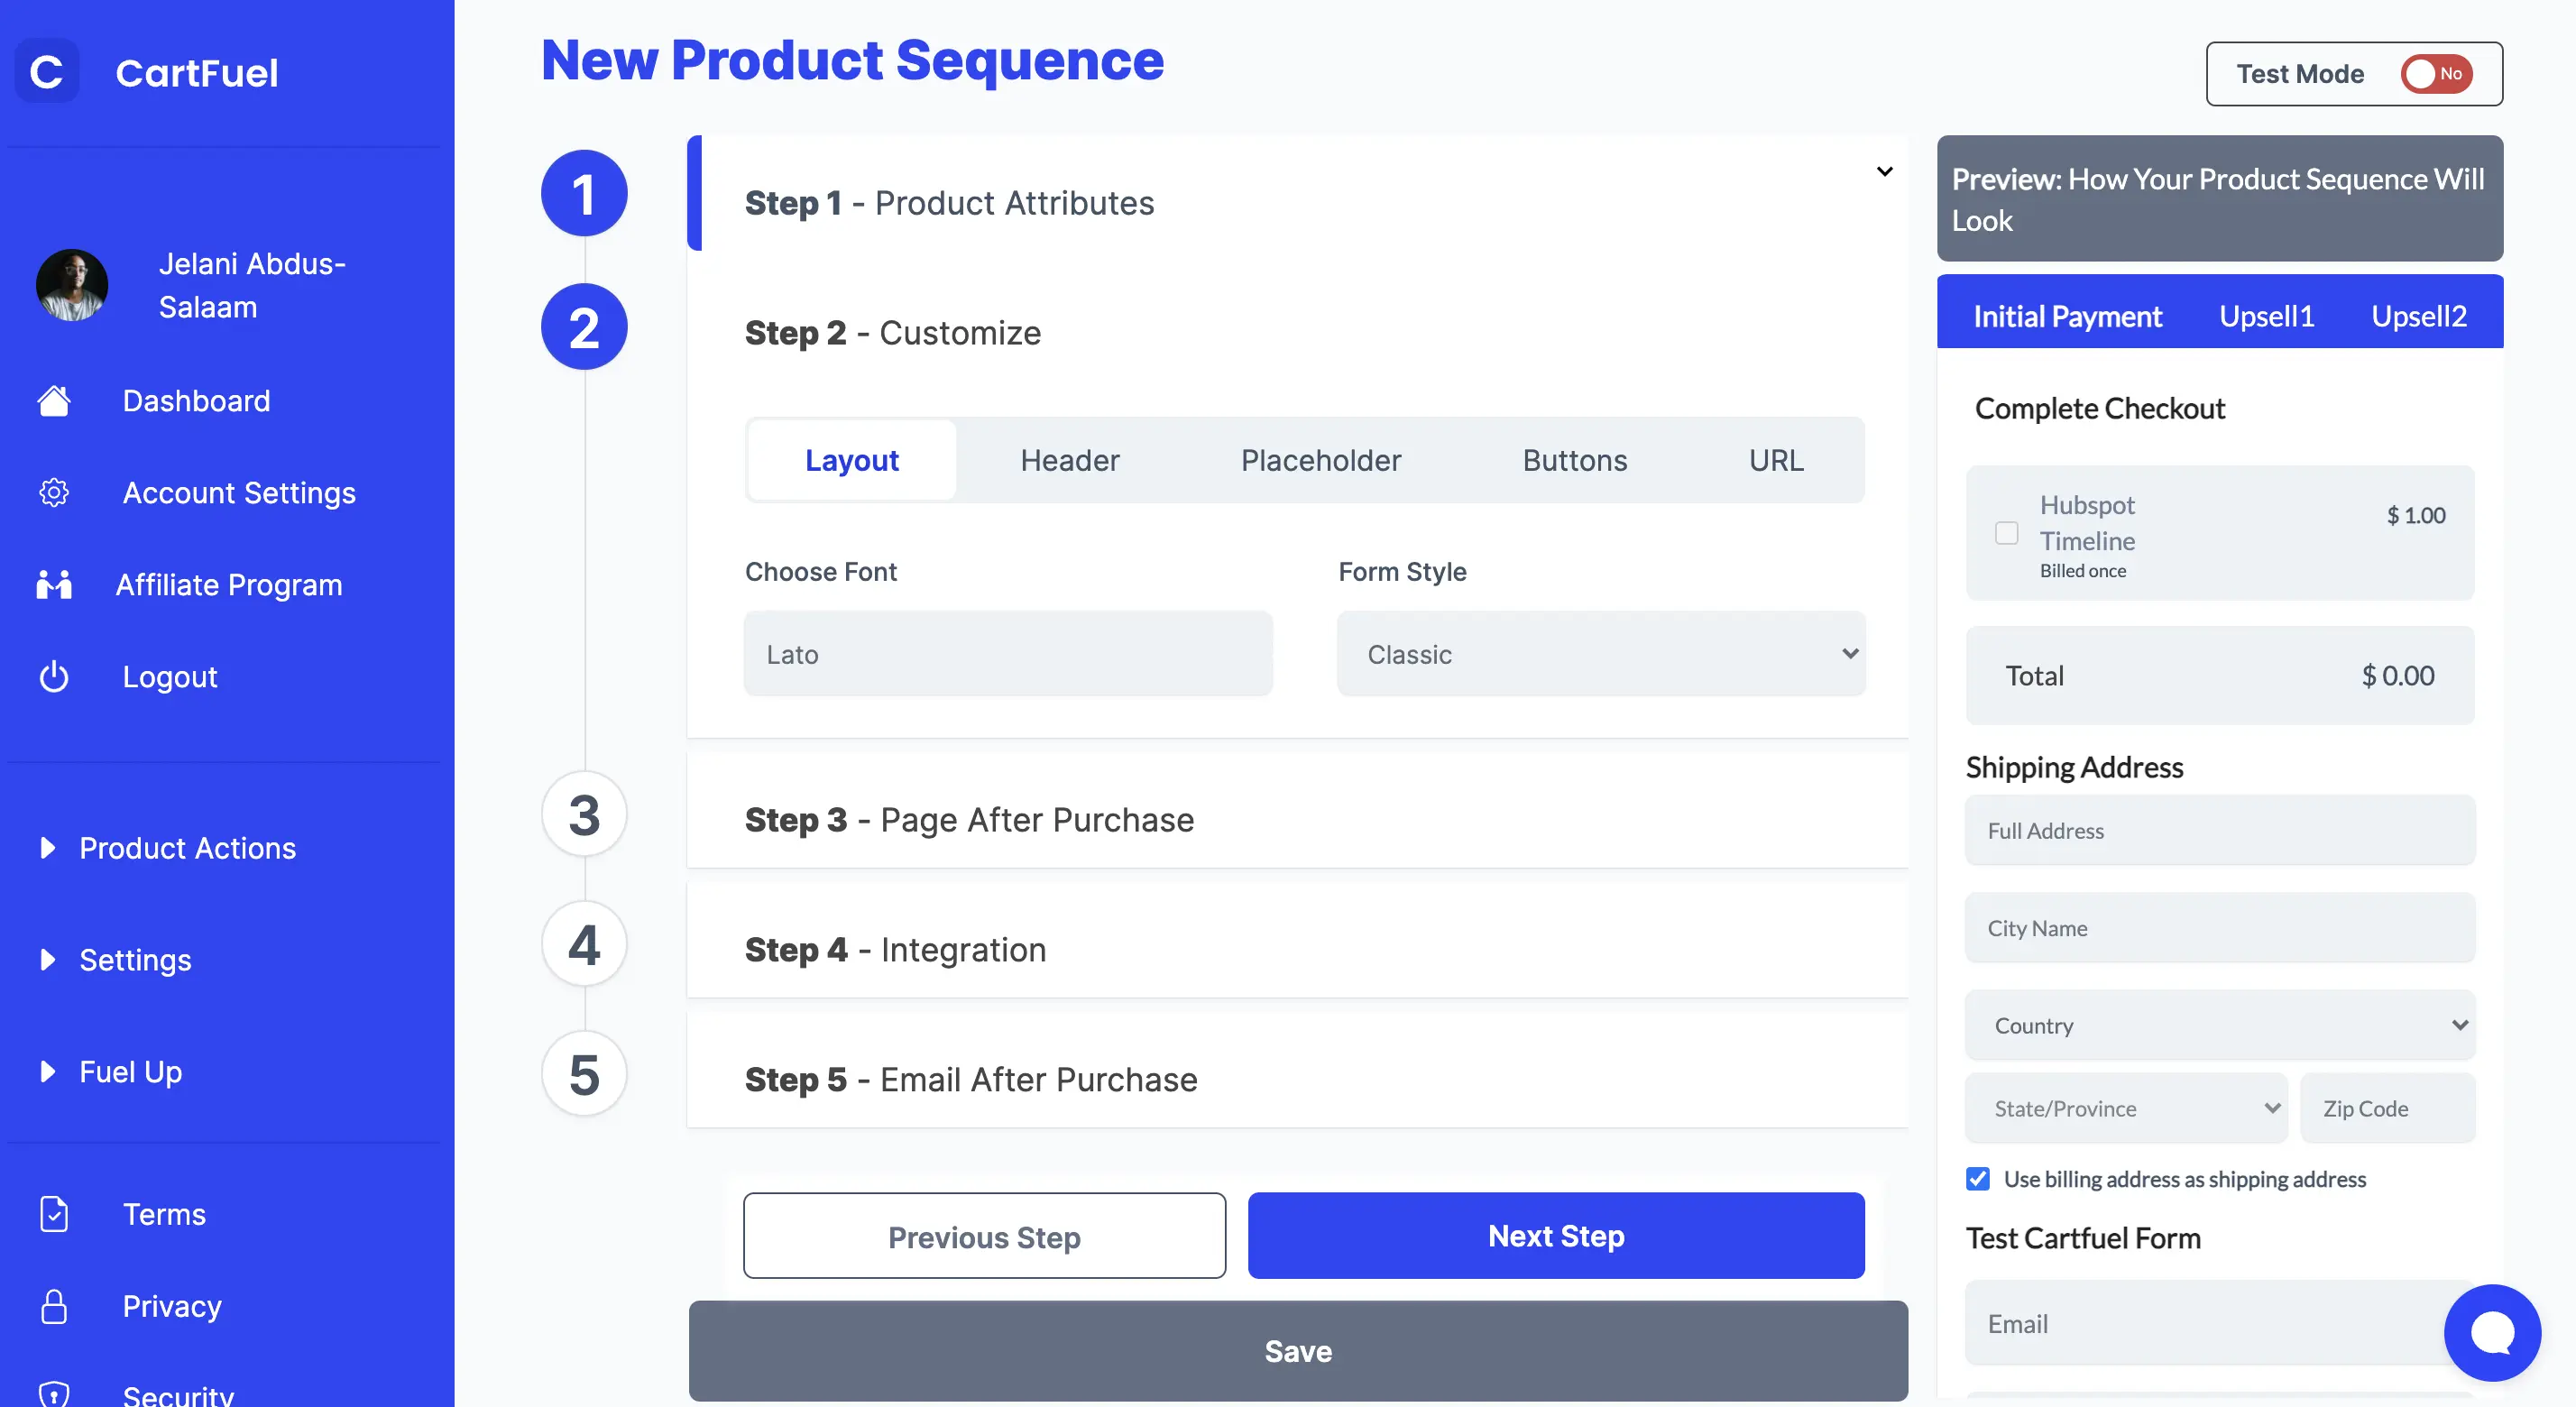
Next, you will want to select which payment form style you want.
Cartfuel gives you two options.
- Class form style
- 2-step form style
The classic form style is a clean linear style form.
At the top, you have the product name and product price.
At the bottom, we have the area where customers can enter their debit/credit card information.
The two-step form is horizontal. It starts with the first step being where the customer enters the full name and email address.
Once complete, the customer can proceed to enter their credit/debit card.
From there, you can edit the payment form header text as well as the placeholder text.
You can also edit the button text, button color, button size, and button radius.
It's your payment form so that you can customize it to your liking.
And if you don't see a customize feature, you can add custom CSS to change the form.
Please note: You will need coding knowledge to change the form using CSS.
Once done, you can proceed to the next step which is where you will decide where you want the buyer to go after they purchase.
You can enter any URL that you'd like like the thank you page URL or an upsell page URL.
In this example, we'll just enter an upsell URL. (This URL will come from your webflow site)
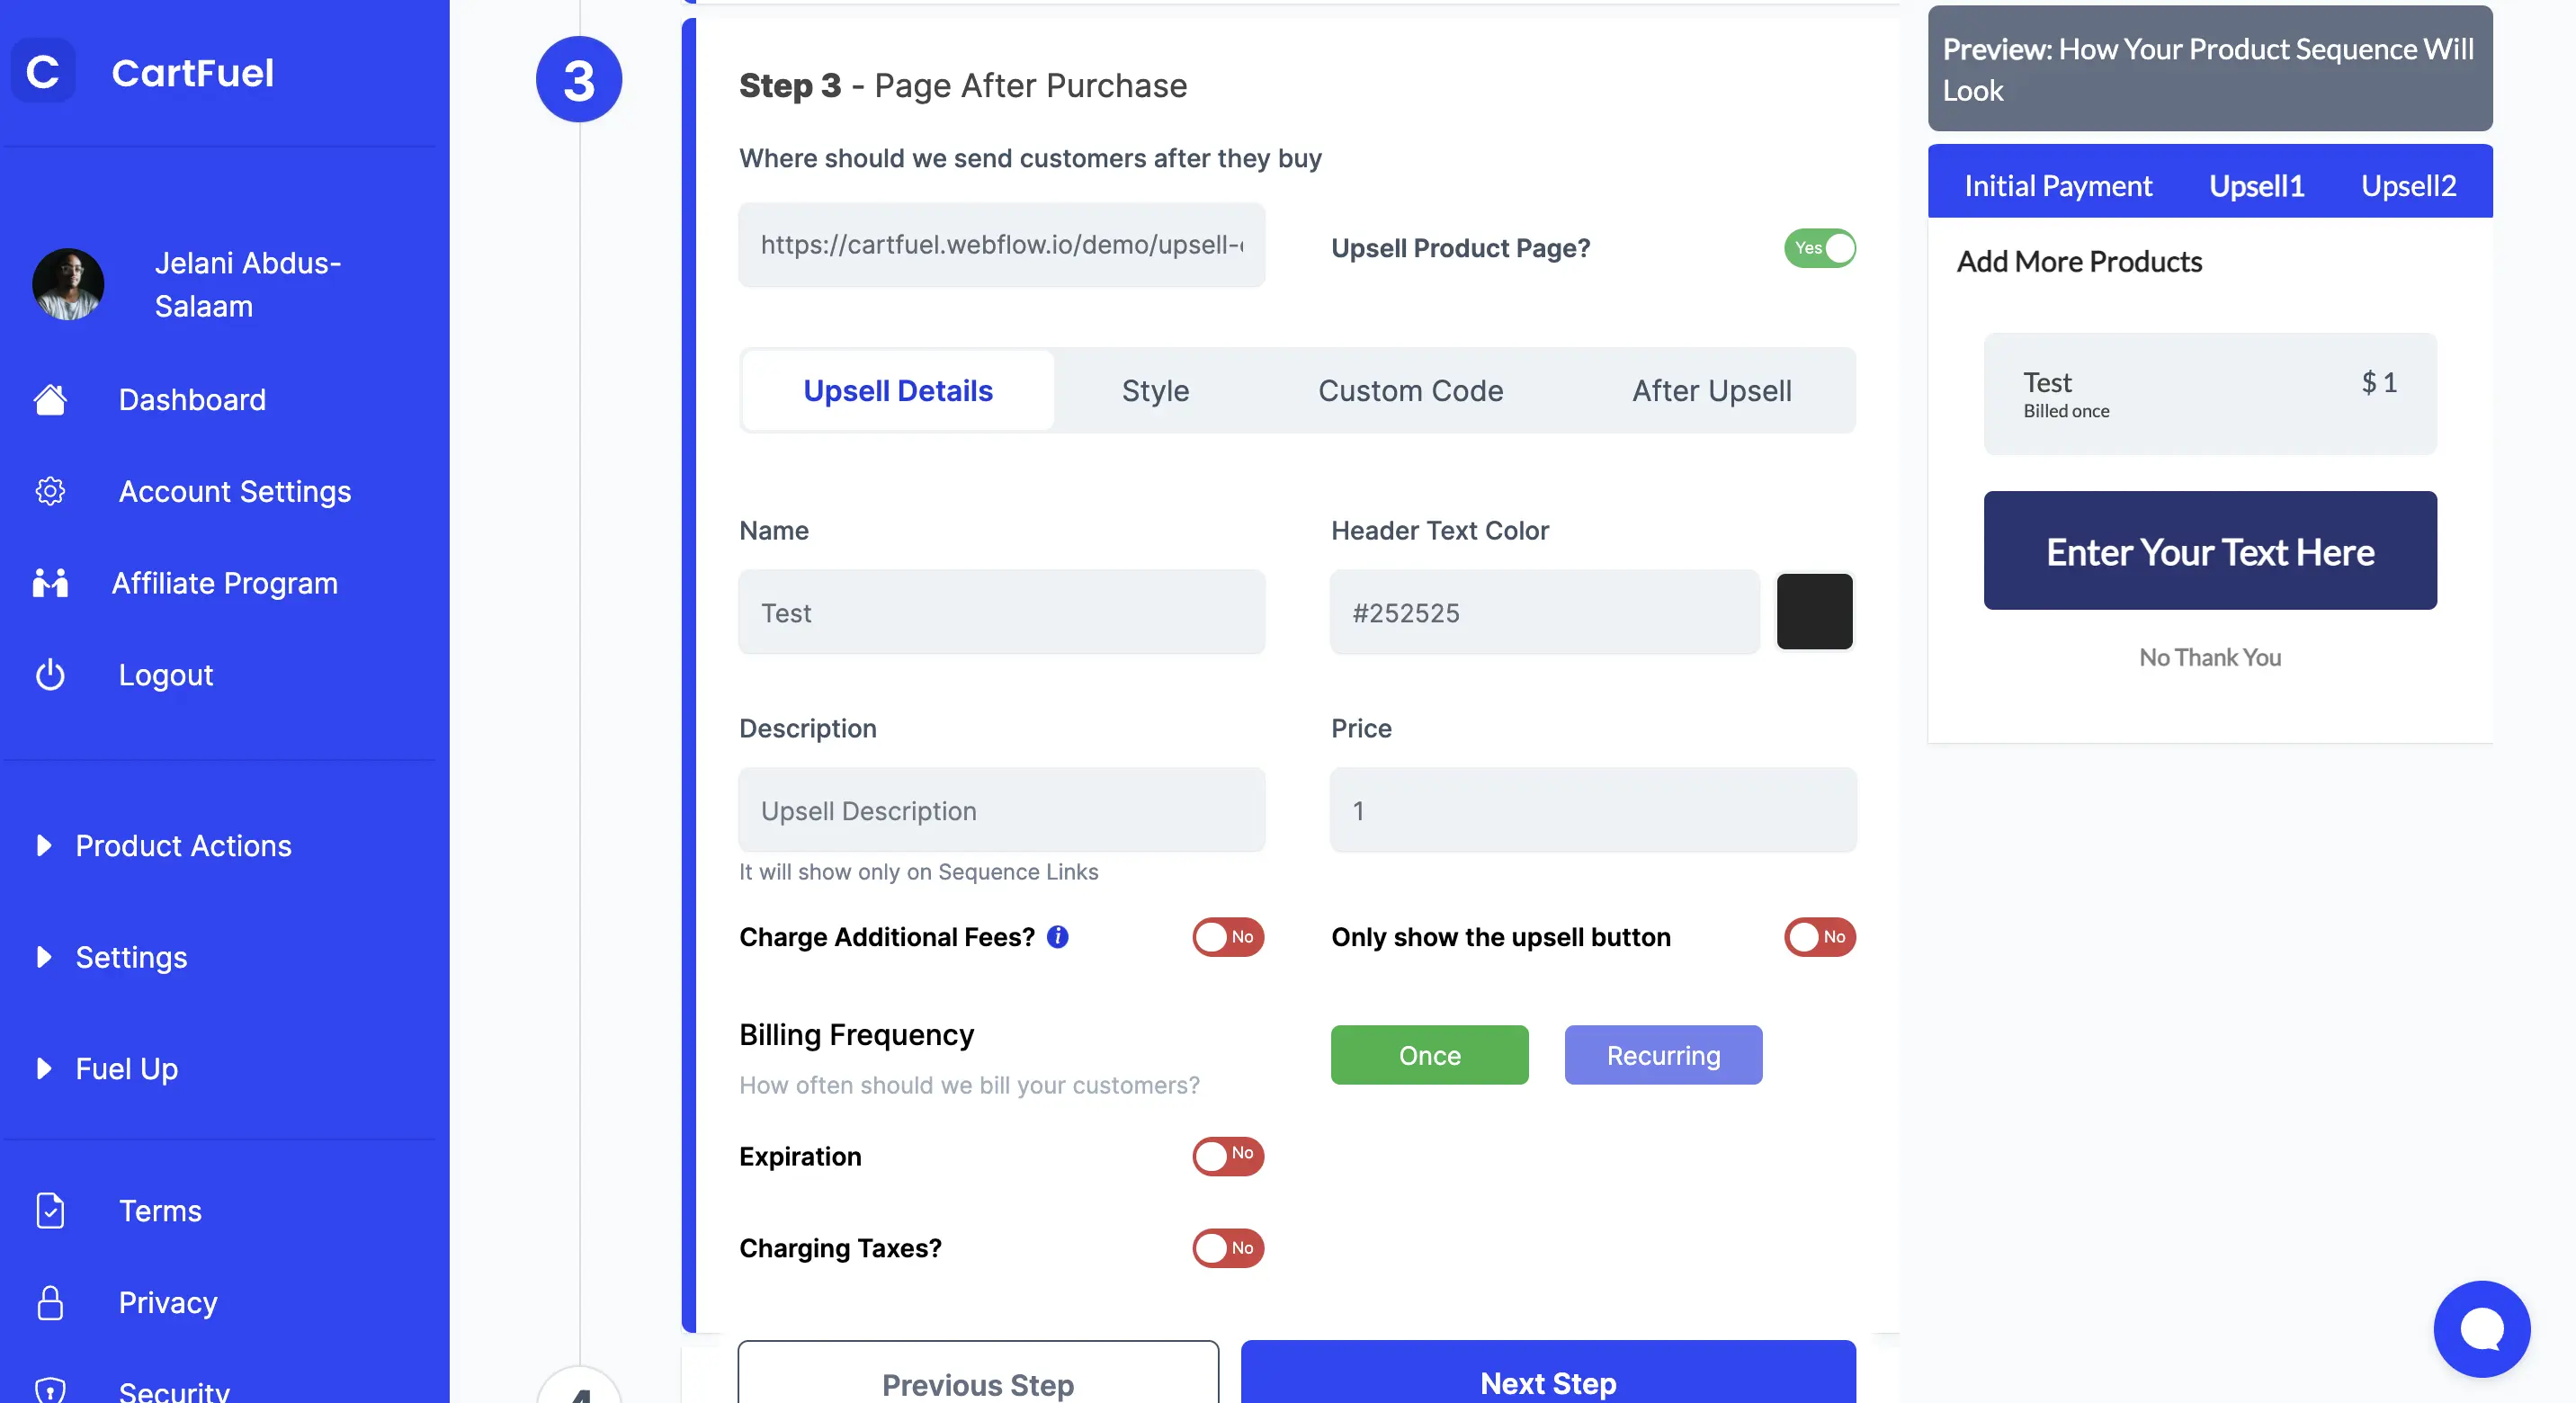
Because we decided to send them to an upsell page, we have to configure the upsell. Upsells are used to increase your revenue so it's a good idea to offer them if you have another product in mind to sell after your main product.
After you configure your upsell, in the after upsell tab, you will want to enter your thank you page URL. (The URL of where you want the customers to go after they see the upsell page)
Then in step 4, you will configure your integrations. Specifically, in this case, your Kajabi integration.
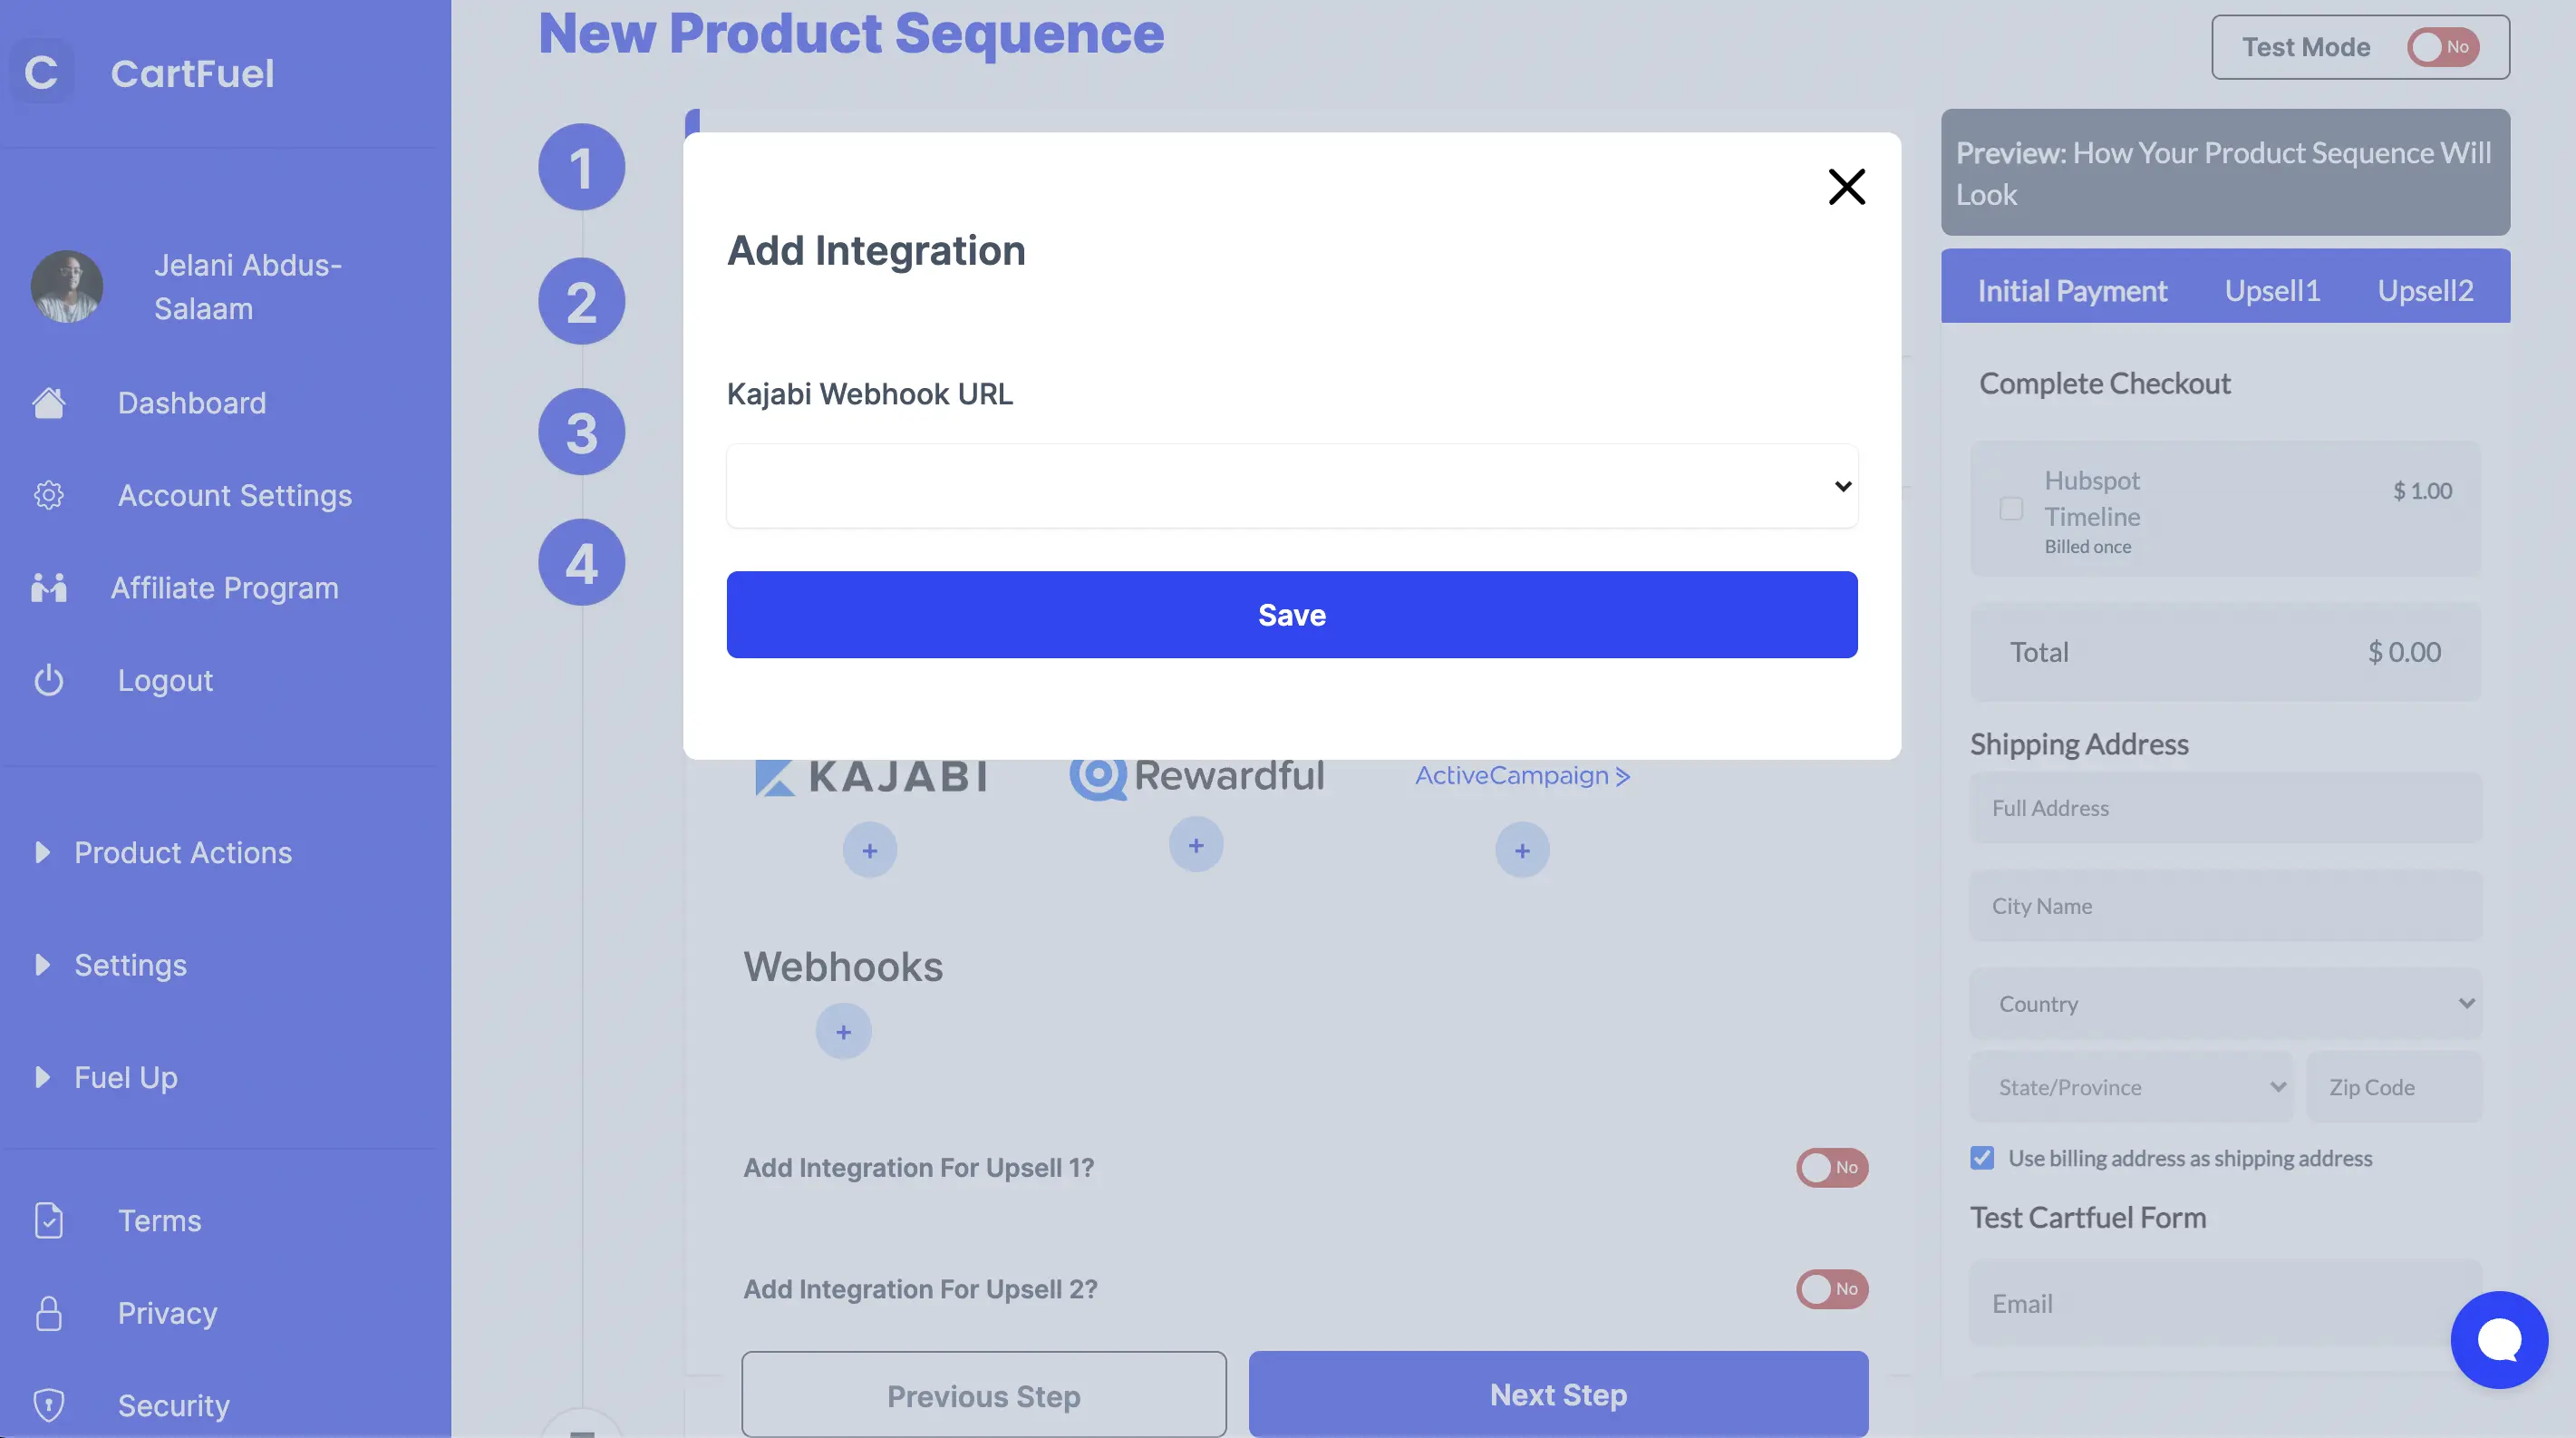
From the dropdown select the Kajabi Webhook that we added in the previous step.
Then click save.
How To Sell Your Course On Your Website
Once you have created a new product sequence in Cartfuel and you click save, a popup will appear.
You will see two sets of codes (or more depending on if you added one-click upsells)
You will want to click on the first code snippet. It will copy the code for you.
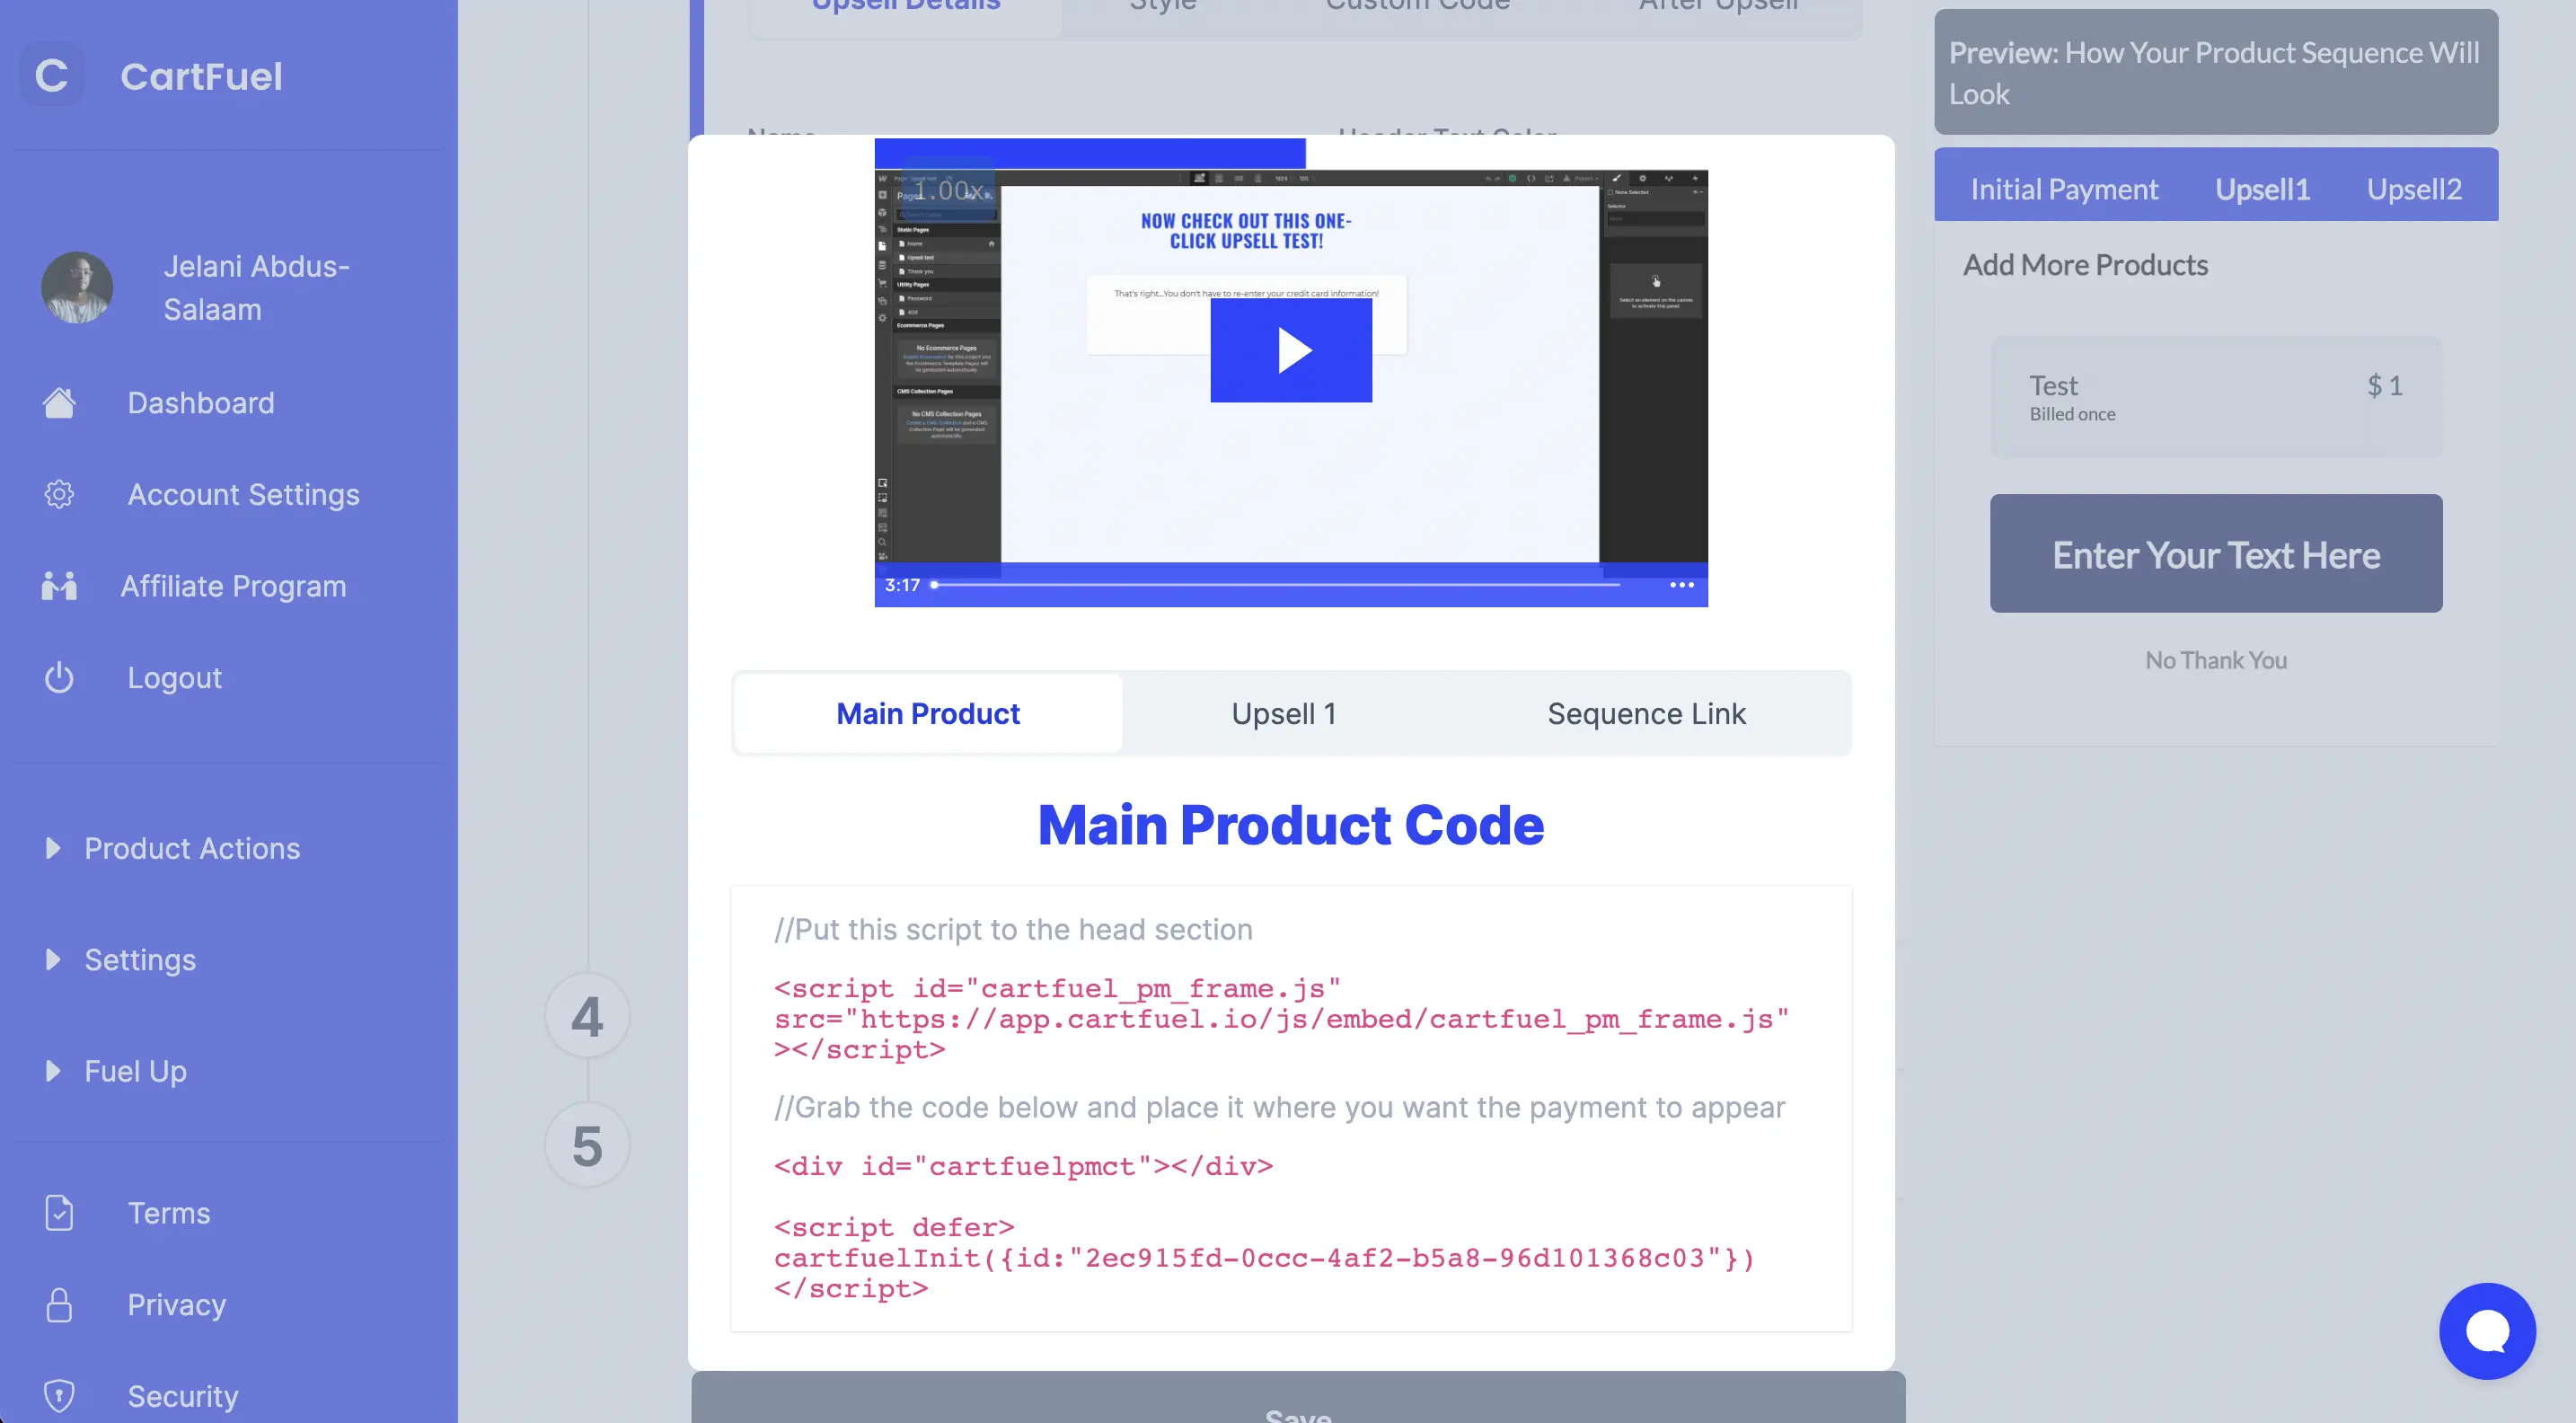
Don't fret; you don't have to know anything about coding or what the code is doing.
All you need to do is go to your website and add the code to wherever you want your payment form to appear.
For example, if you are using WordPress or Webflow, you will first add an HTML or Embed element to your site.
Watch the in-depth tutorial
Depending on your theme, it may be as easy as dragging and dropping the HTML/Embed element on your site.
In the HTML/embed element, you will want to paste the first code snippet.
Then you will head back to Cartfuel and grab the second code snippet.
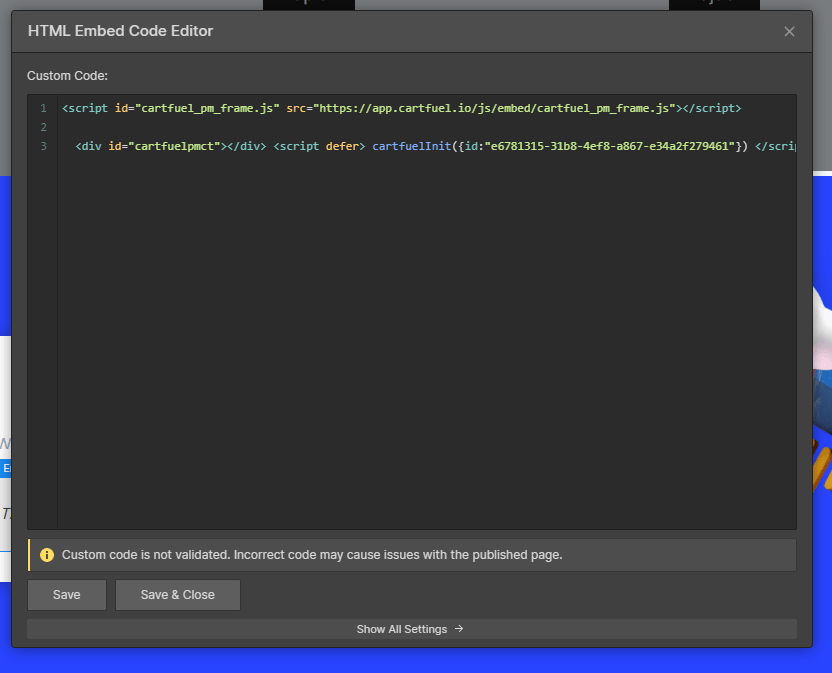
Go back to your site and then paste the second code snippet into the HTML/embed element.
Then click save on your website.
This process will be the same for any site/platform as long as the site/platform has embeds.
If you choose to use one-click upsells, you will then have to follow the same process on your upsell page.
Now, if you preview your website, you will see the payment form appear.
We recommend that you test the form and make sure you get added to your course.
To test correctly, turn your product sequence to try mode in Cartfuel.
Then test the payment form with 4242 4242 4242 4242 - 04 / 24 - 242 - 424
In test mode, you will not get added to Kajabi, so after you do a preview, turn the product sequence off test mode.
Then test your product sequence on Webflow with a real working credit or debit card.
Once you finish testing, you can now promote your new course on your new website!
And as you sell, your customers will be sent directly into your course in Kajabi.
Effective Marketing Strategies to Promote Your Online Course
Once you have your website set up and your course uploaded, the next crucial step is to effectively market your course. Here are some strategies to help you reach potential students and increase your sales:
1. Leverage Social Media
Utilize platforms like Instagram, Facebook, and LinkedIn to share insights related to your course content. Create engaging posts, stories, and reels to showcase snippets of your course, behind-the-scenes content, or testimonials from early users. Engaging with your audience through polls or Q&A sessions can also build interest and encourage participation.
2. Create Valuable Content
Develop content that complements your course, such as blog posts, videos, or podcasts. This content should address topics related to your course and provide actionable insights. By showcasing your expertise, you can build trust with your audience, making them more likely to purchase your course.
3. Offer Free Workshops or Webinars
Hosting a free workshop or webinar can be a fantastic way to provide value upfront while promoting your course. Choose a topic relevant to your course material, and use this opportunity to demonstrate your teaching style and knowledge. At the end of the session, you can introduce your course as a more comprehensive solution for attendees.
4. Utilize Email Marketing
Build an email list by offering a free resource (like an eBook or checklist) related to your course. Use this list to nurture your leads with informative content and exclusive offers. Regularly engaging with your audience through newsletters can keep your course top-of-mind when they are ready to purchase.
5. Collaborate with Influencers
Partnering with influencers or thought leaders in your niche can help amplify your reach. Look for individuals whose audience aligns with your target market and propose a collaboration, whether through guest blog posts, social media takeovers, or joint webinars.
6. Implement SEO Strategies
Optimize your course website for search engines to attract organic traffic. Conduct keyword research to identify terms your target audience is searching for and incorporate these keywords into your website content, course descriptions, and blog posts.
7. Encourage Reviews and Testimonials
Social proof is powerful in convincing potential customers of your course's value. Encourage students to leave reviews and testimonials, which you can display prominently on your website and marketing materials. Consider offering incentives for feedback, such as a discount on future courses.
8. Create a Referral Program
Encourage existing students to refer others to your course by creating a referral program. Offer discounts, bonuses, or exclusive content to both the referrer and the new student to incentivize sharing.
By implementing these marketing strategies, you can effectively promote your online course, reach your target audience, and increase your sales. Remember that consistency is key, so continually engage with your audience and adapt your strategies based on feedback and performance metrics.
FAQ
What type of content should I include in my online course?
Your course content should align with your target audience’s needs and interests. Consider including a mix of video lectures, written materials, quizzes, assignments, and interactive elements. Use a variety of formats to keep learners engaged and accommodate different learning styles.
How can I market my online course effectively?
Effective marketing strategies include utilizing social media, content marketing, email campaigns, and paid advertising. Build an audience by providing valuable content related to your course topic, and consider offering free webinars or resources to attract potential students.
How does Cartfuel integrate with other platforms?
Cartfuel can be integrated with platforms like Webflow and Kajabi to handle the payment processing aspect of selling courses. It provides customizable checkout experiences and can be easily connected to your existing website, making it a flexible option for course sales.